


- Resource
- Class for Teams
- Class for Teams – Learning Tools – Course Content
Class for Teams – Learning Tools – Course Content
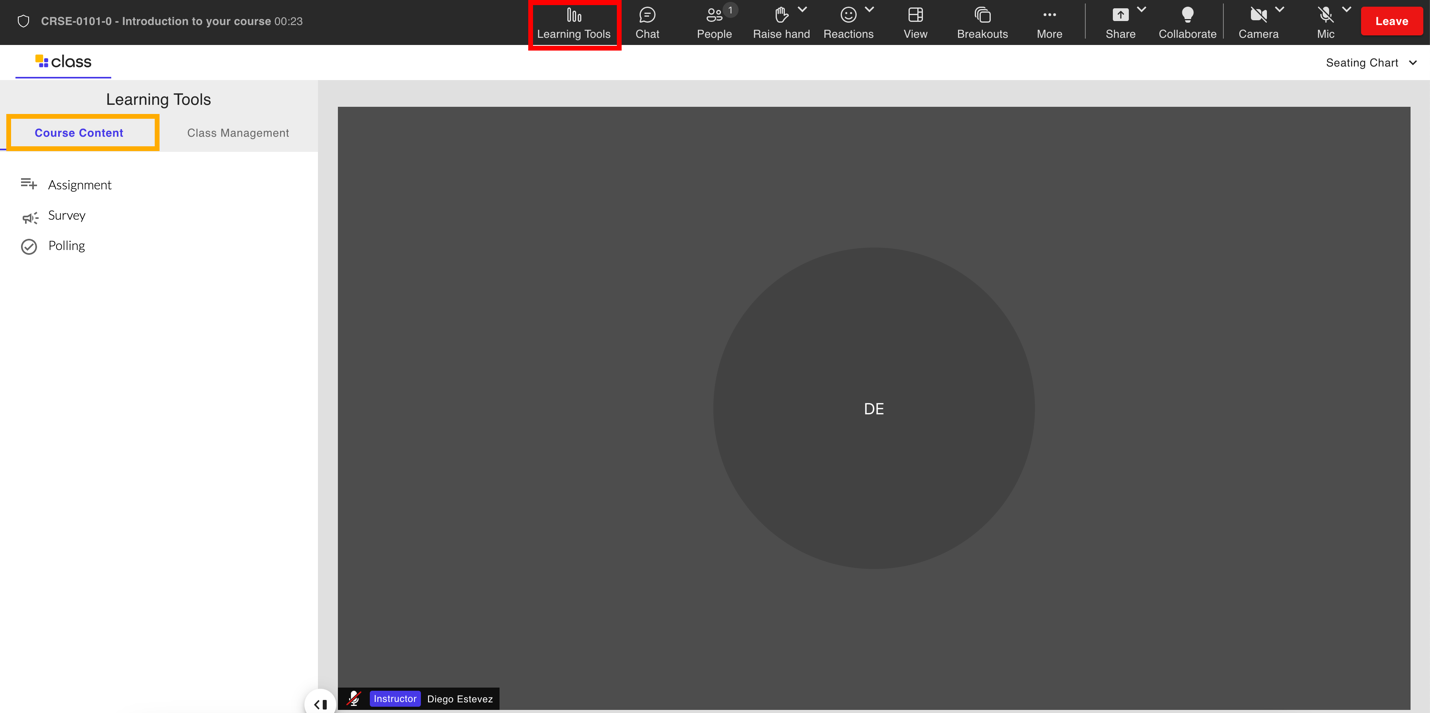
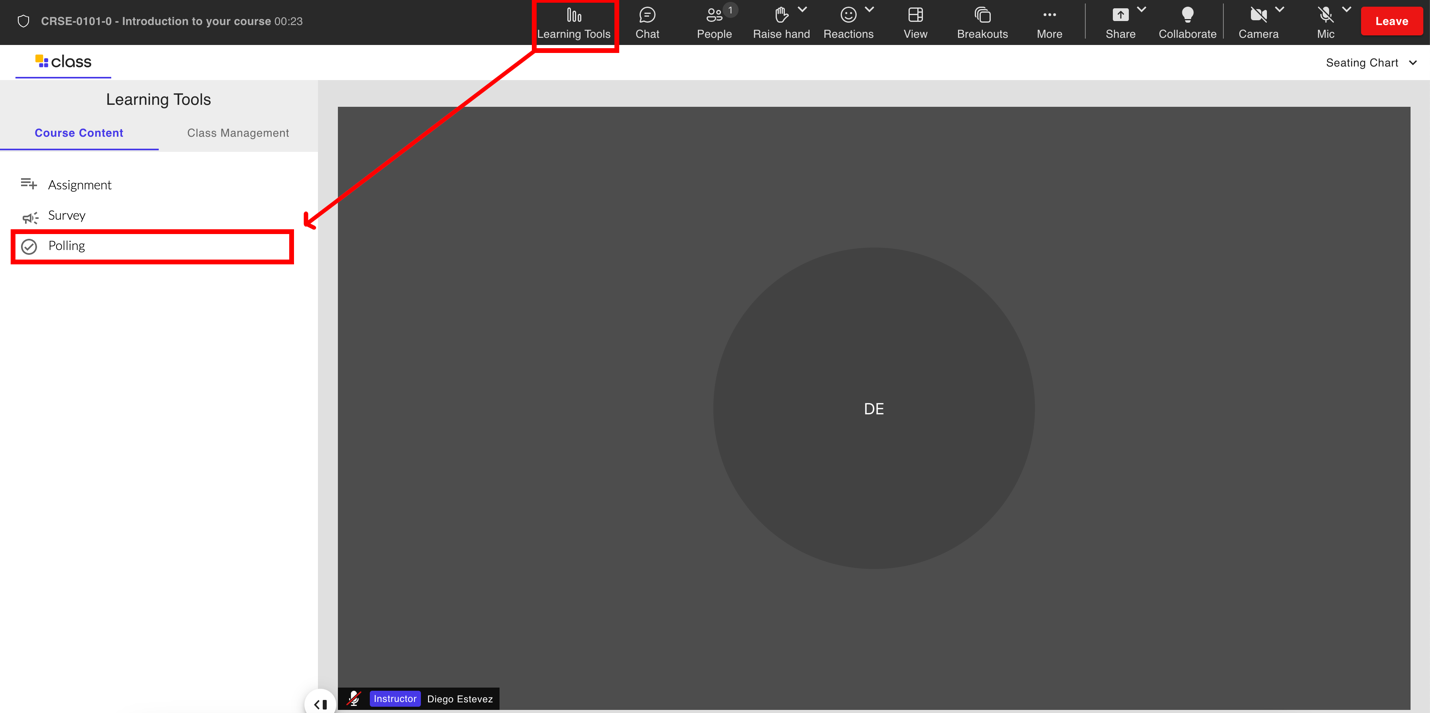
Instructors can use the tools found in course content to administer polls or surveys, or to have students quickly transfer files in real-time. Once you are inside your Class room click on Learning Tools and Course Content.
Note:
- Please note if you have Enhanced Learning Management enabled you will see your Learning Hub Content and not Class’s Course Content tools shown below.
- Please note that none of the following tools below are synchronized with the Learning Hub. This means if you create material using the Course Content tools in Class they will not populate in the Learning Hub nor will any grades or assessments be carried over into the Learning Hub. If you wish to have this functionality please consider enabling Enhanced Learning Management System feature of Class.
Note:
Please note that you can import Course Content into a Class session if you have created them before from a previous Class session.
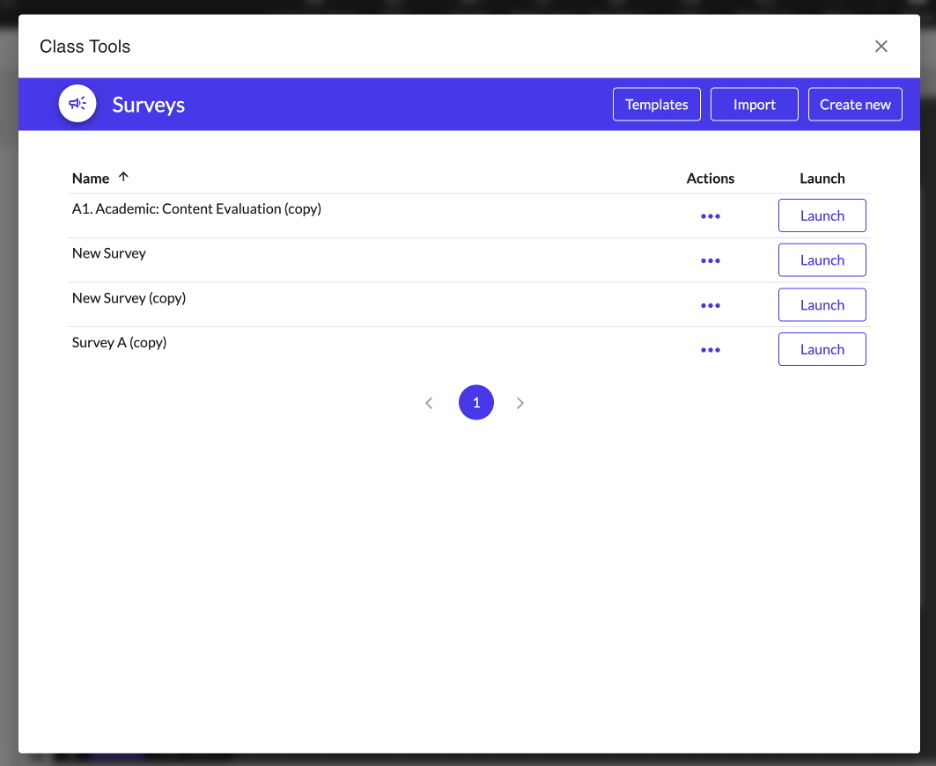
Surveys
Instructors can create surveys that can consist of various question types and which they can immediately pose to their students to see quick results. To creates surveys:
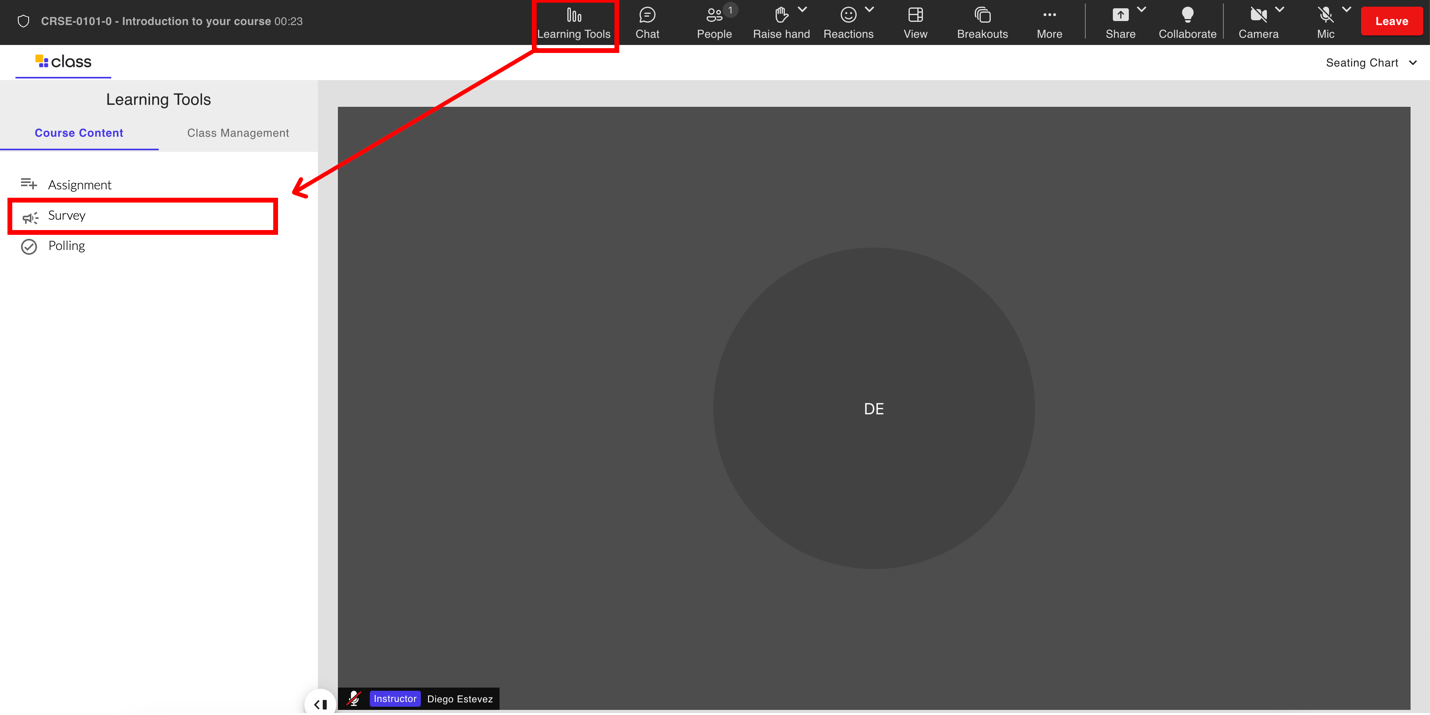
- Select Survey
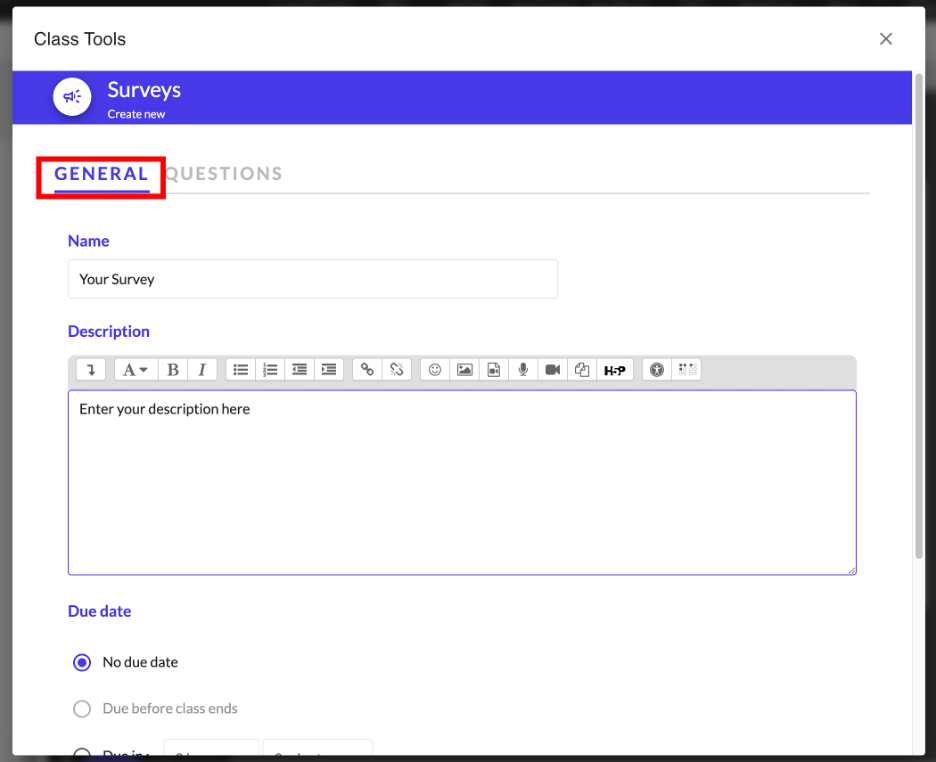
- Select Create new.
- Update the Survey name.
- Update the Description.
- Set the Due Date. (We recommend not having one)
- (Optional) Select Auto number questions to provide a number next to each questions
- (Optional) Select show participant names with answers. This option makes it so students can see the names of other students in the Class room next to their answers on the survey results screen. Keep this off to keep names survey answers anonymous.
- Select the Questionstab to add questions to the survey.
- Choose your Assessment Question Types.
- Select Save.

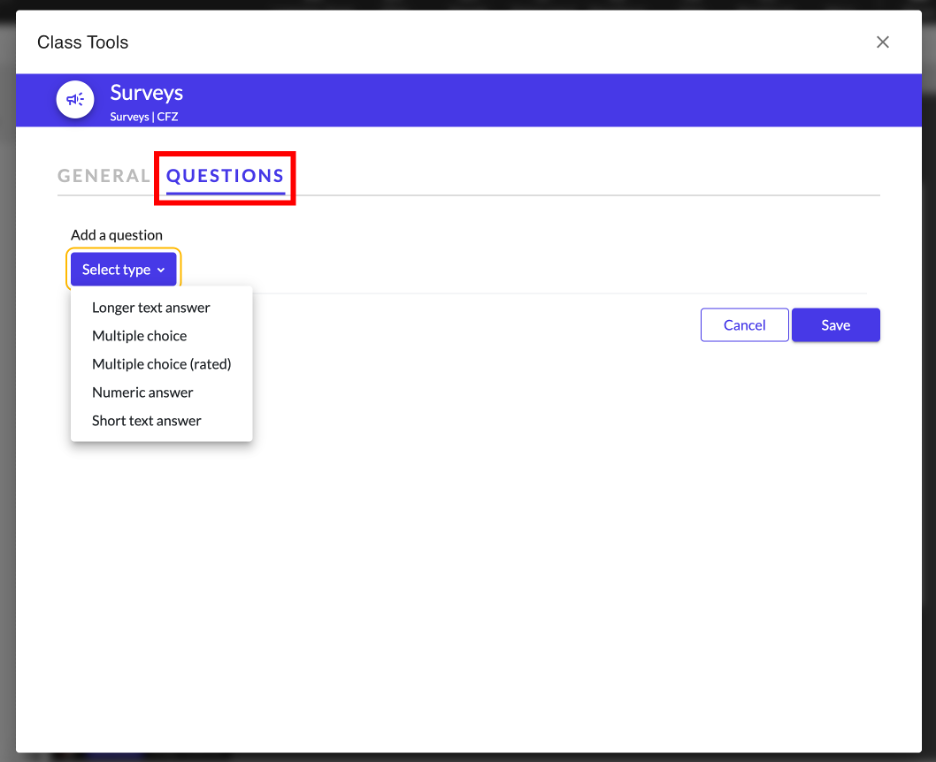
Survey Question Types
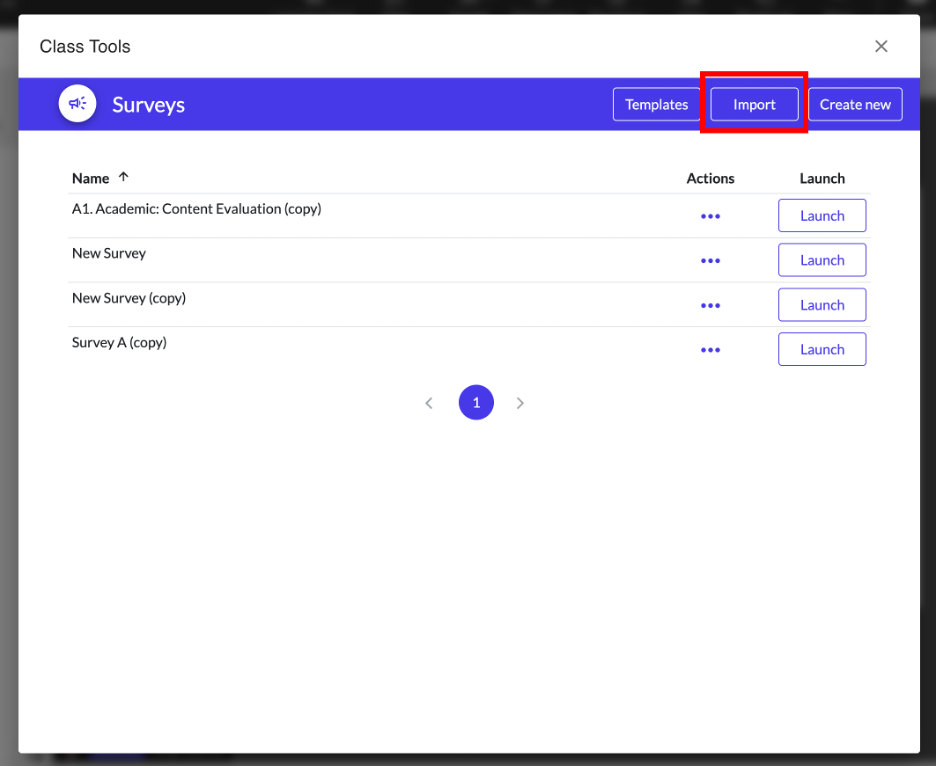
Importing Surveys
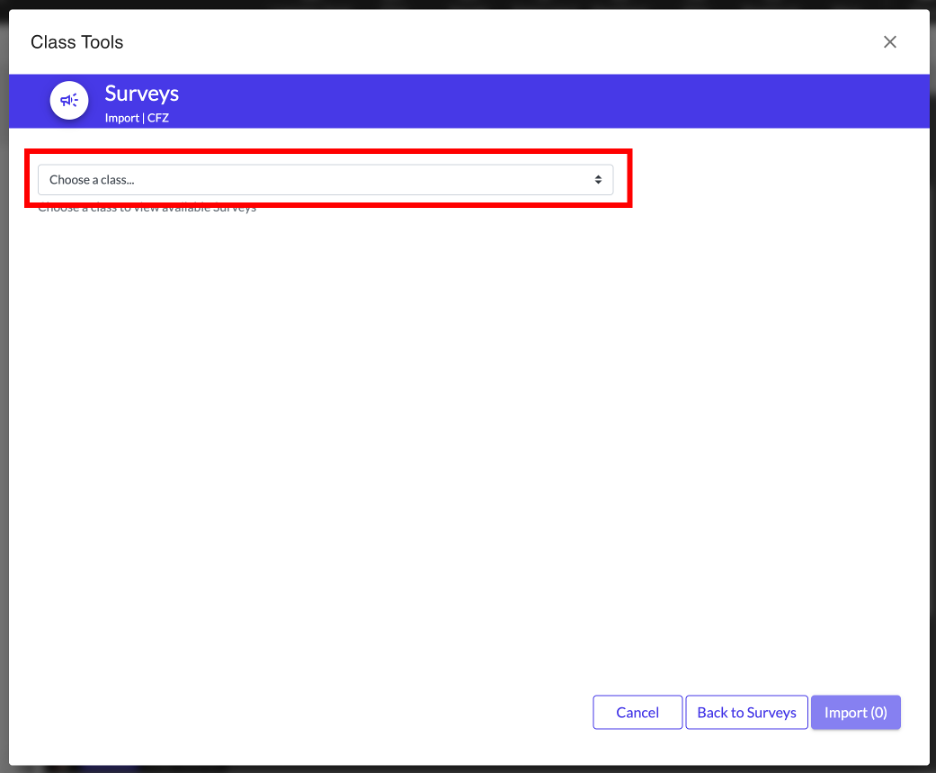
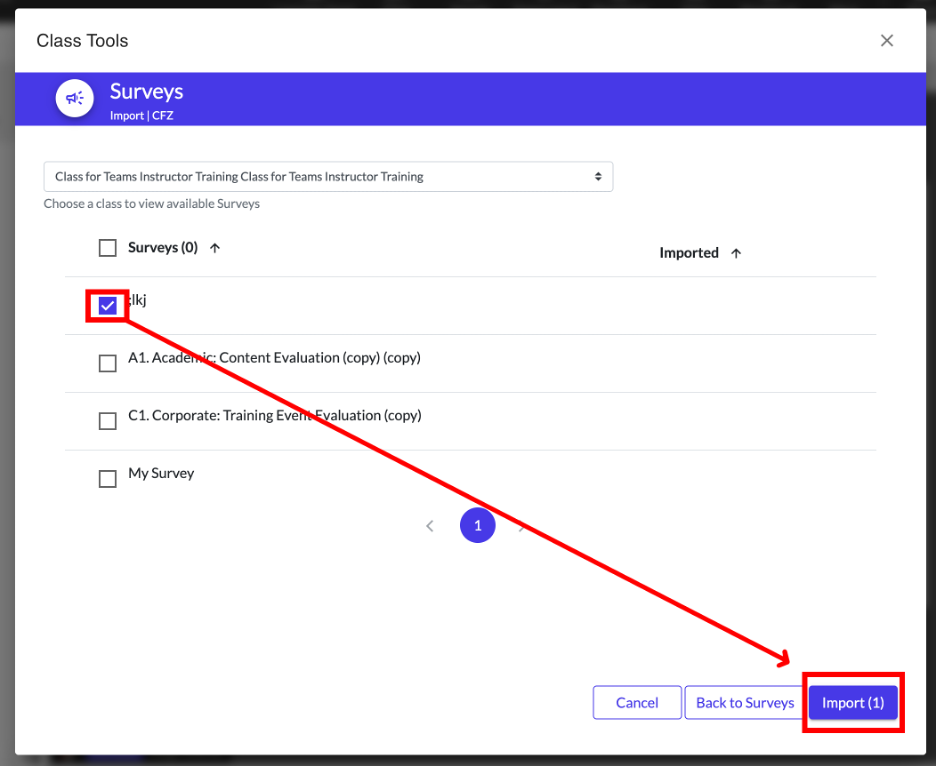
Class allows you to import your previously created surveys from your other Class rooms on different Learning Hub courses. To do so click the Import button on the Surveys tool and then click the dropdown menu labelled Choose a class… Select the name of your other Class room and a list of the surveys that you have created from that Class room should come up. Tick the checkbox next to the survey(s) and then click Import to import the survey(s) in the Class room that you are in.
Create Surveys in Advance
We recommend making your surveys in advance of your actual Classroom meeting time. Also please note that an answered survey cannot be reused. To reuse a survey please duplicate it and then Launch it
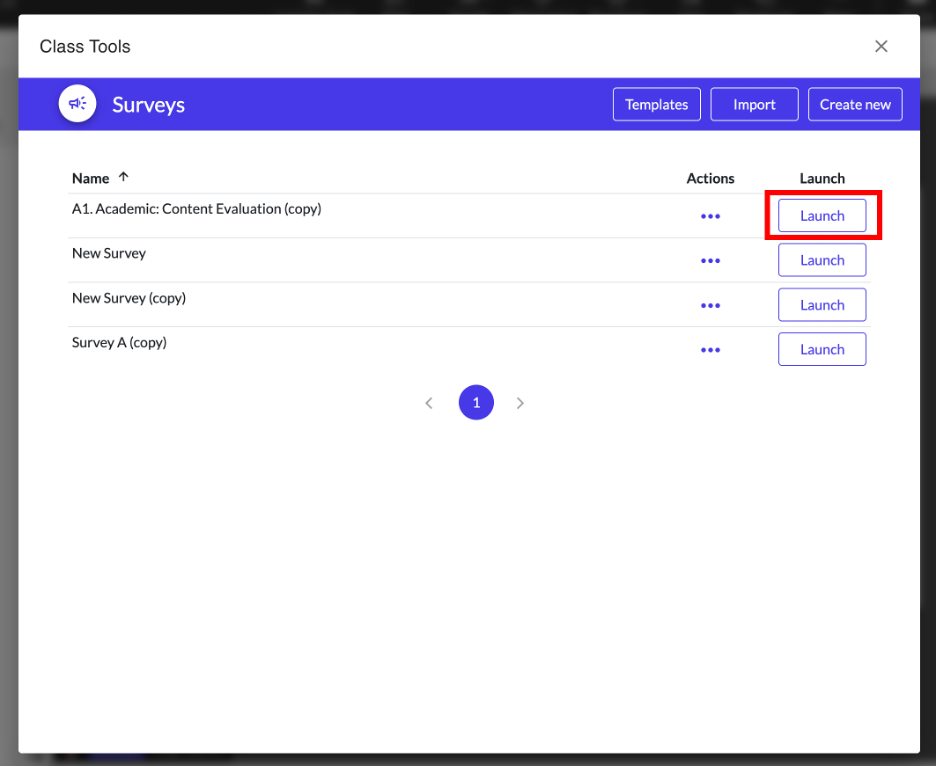
Launching Surveys
After you created or imported your surveys, you need to launch them if you want the students in your Class room to answer them. To launch a survey all you need to do is click on the Launch button next to the survey.
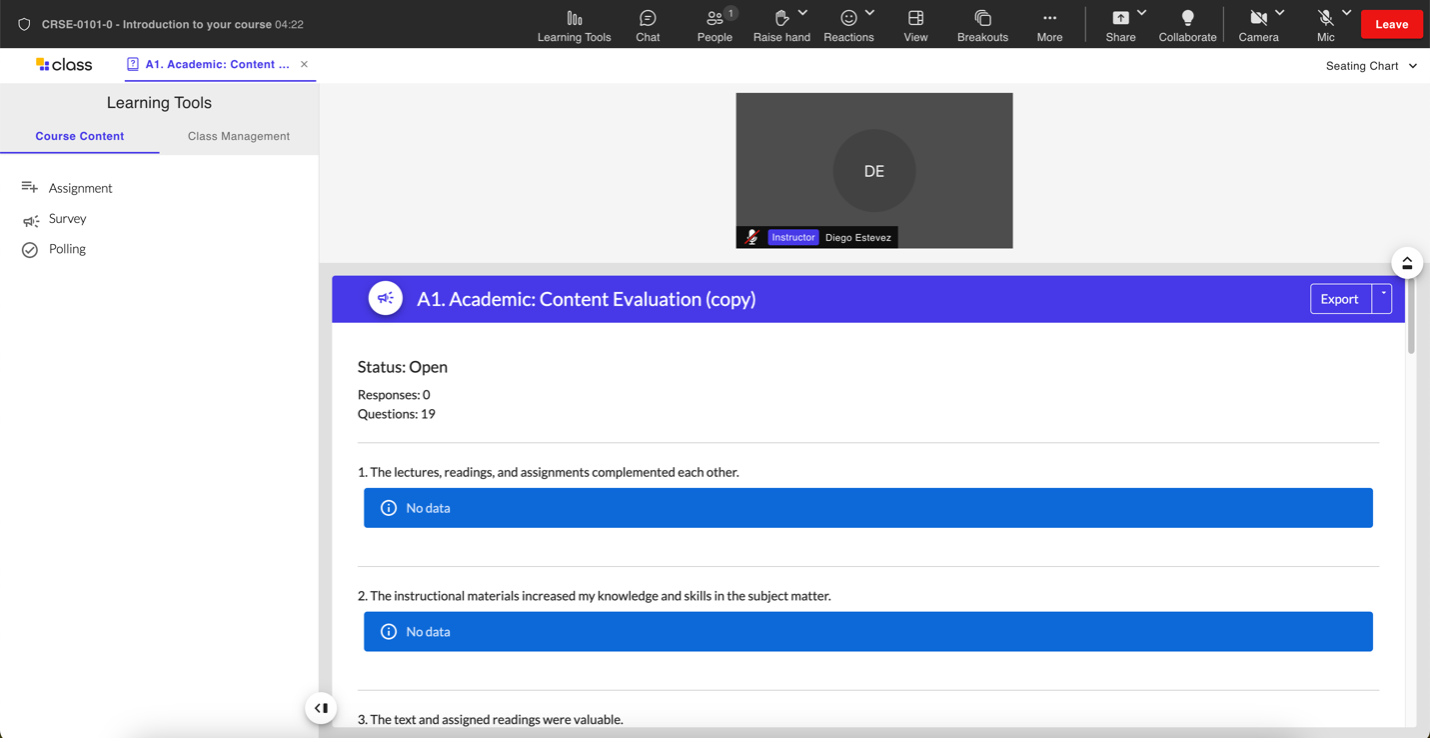
Launched surveys will automatically appear on everyone’s screen although the view for instructors and students are different. From the instructor’s perspective you only see the results screen for the survey, the results screen will update on the fly whenever students submit their answers to the questions.
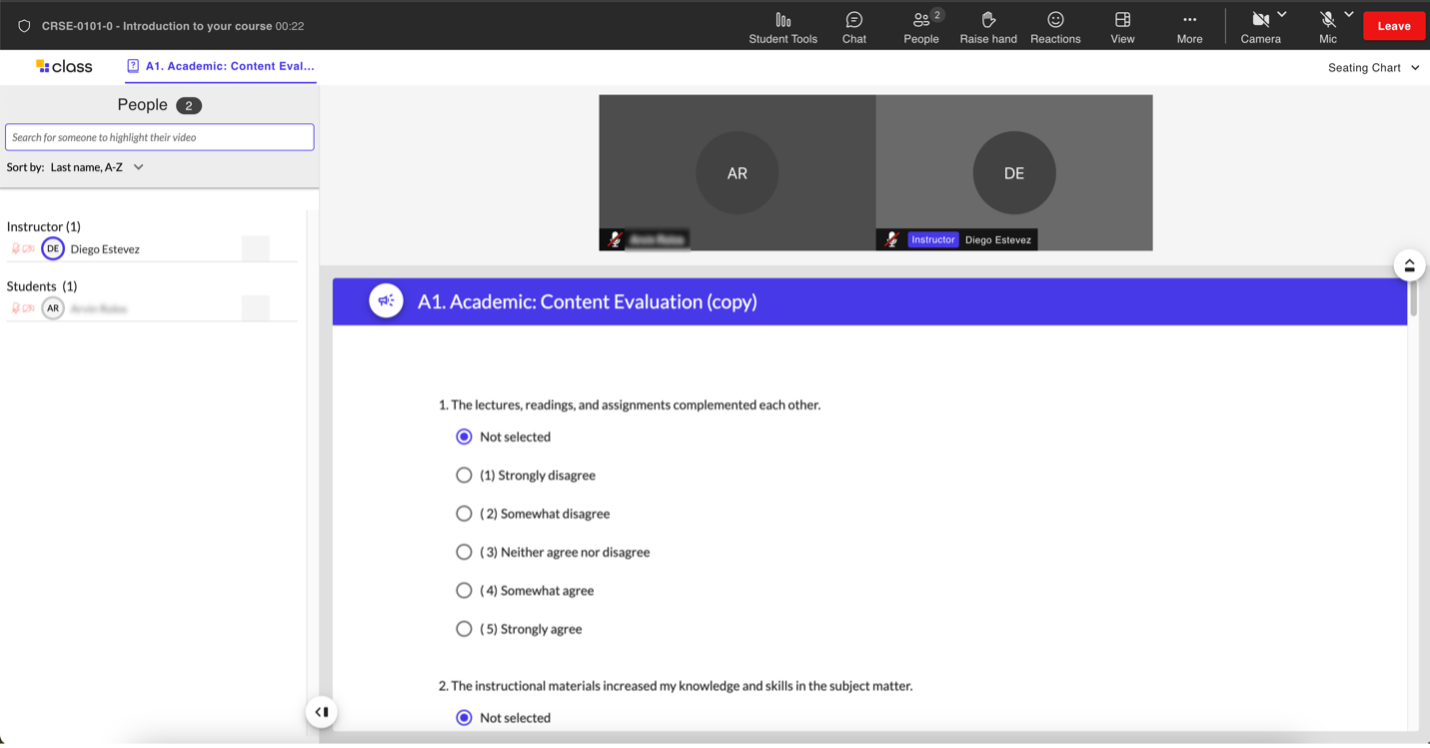
From the students perspective they will be given the questions to answer and after they have submitted all their answers, they will be able to see the same results screen you see (except without the ability to export results).
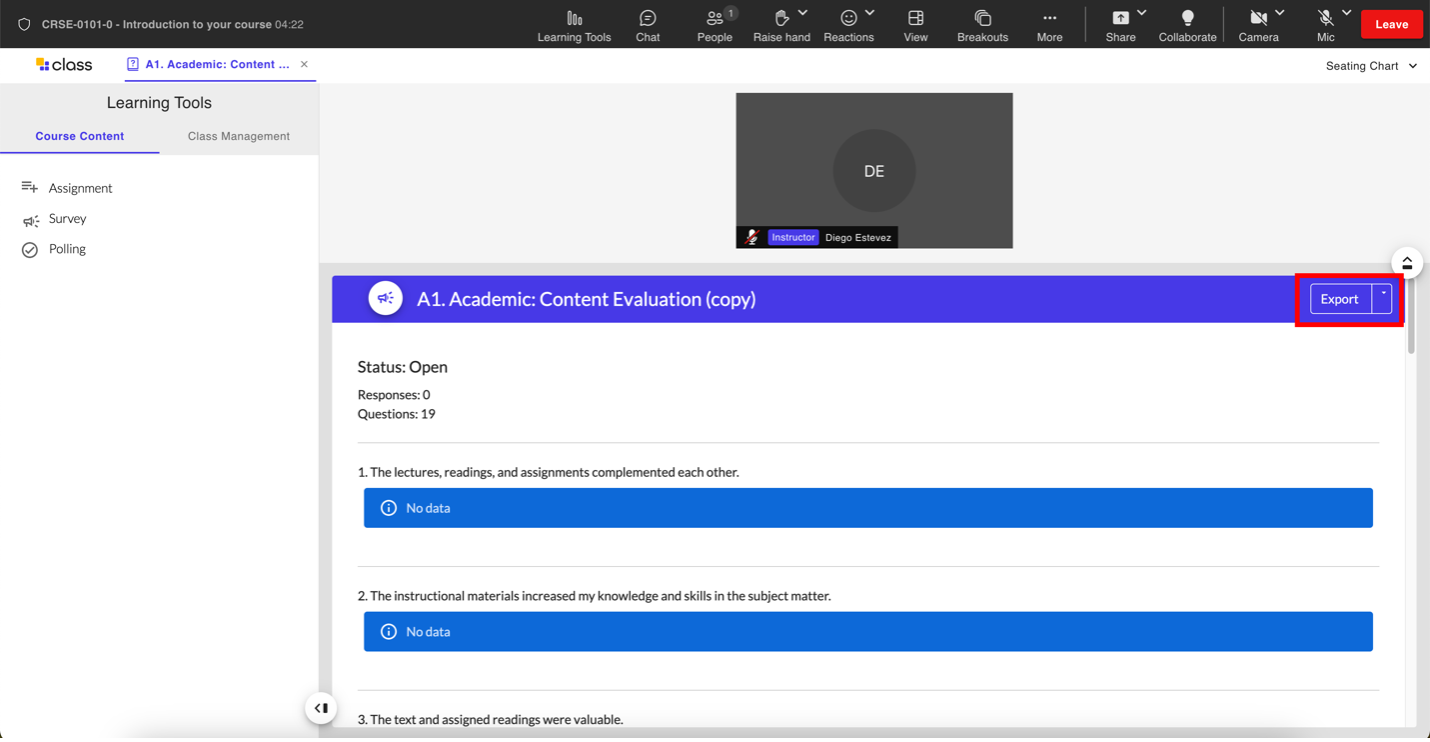
Downloading Survey Results
You can download the results of the surveys you launch into either an .csv or .xls file by clicking on the Export button on the top right of the survey results screen.
After everyone has completed the survey, everyone will see live survey results. The survey will remain on the screen until you close it. To close or end a survey, close the Survey tab above the podium.
Reusing Surveys
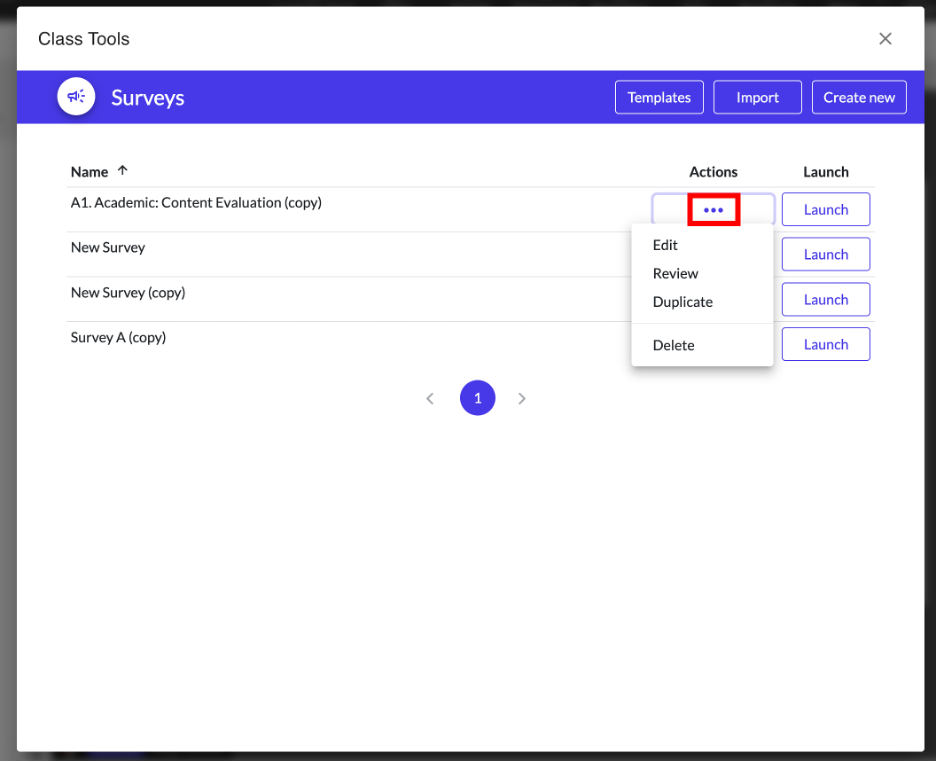
Please note that once a survey (or poll) has been launched and answered by students once, cannot be reused. If you want to reuse a survey, you will have to duplicate it and then launch that duplicate. To duplicate a survey go to the Survey tool in Course Content under Learning Tools. In the Actions columns click … next to the original survey then select Duplicate to copy the survey. From here you can either edit the duplicated survey or click Save
Reviewing, Editing, or Deleting Surveys
To review, edit or delete a survey go to the Survey tool in Course Content under Learning Tools. Find the survey you want and then under the Actions column click … and then select either Edit to edit your survey questions or conditions, Review to see how the survey looks when view from the students perspective or Delete to delete the survey.
Polls
Polls inside the Class room work very similarly to surveys. The key difference between them is that polls only allow you create and launch one multiple choice question whereas surveys allow you to create and launch multiple questions with multiple question types.
Creating polls
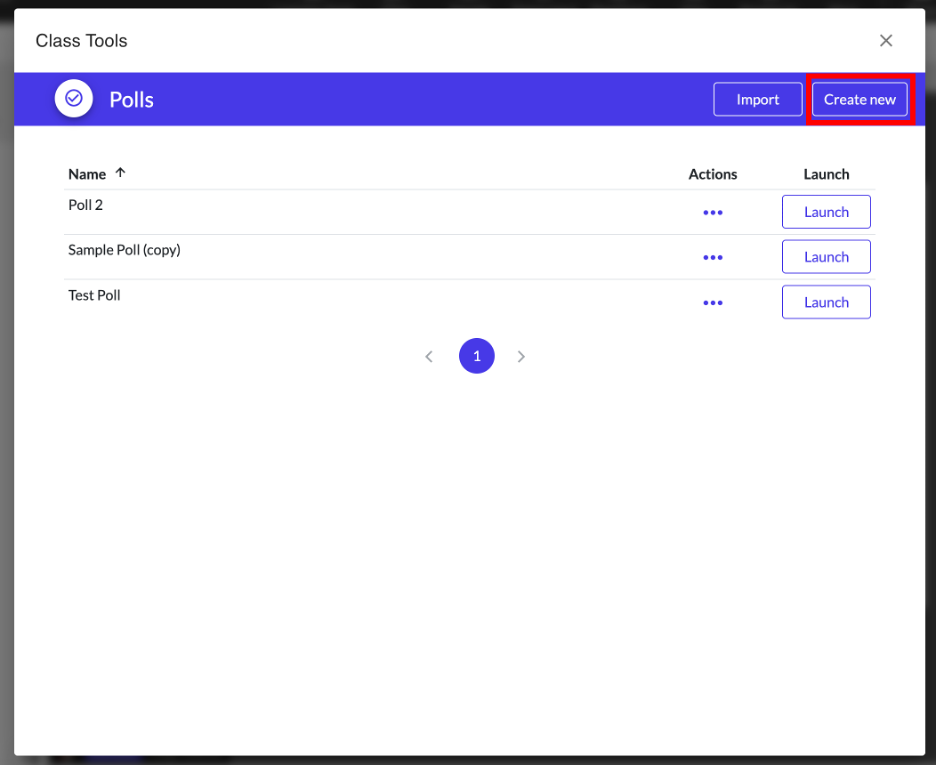
- Select Polling.
- Select Create new
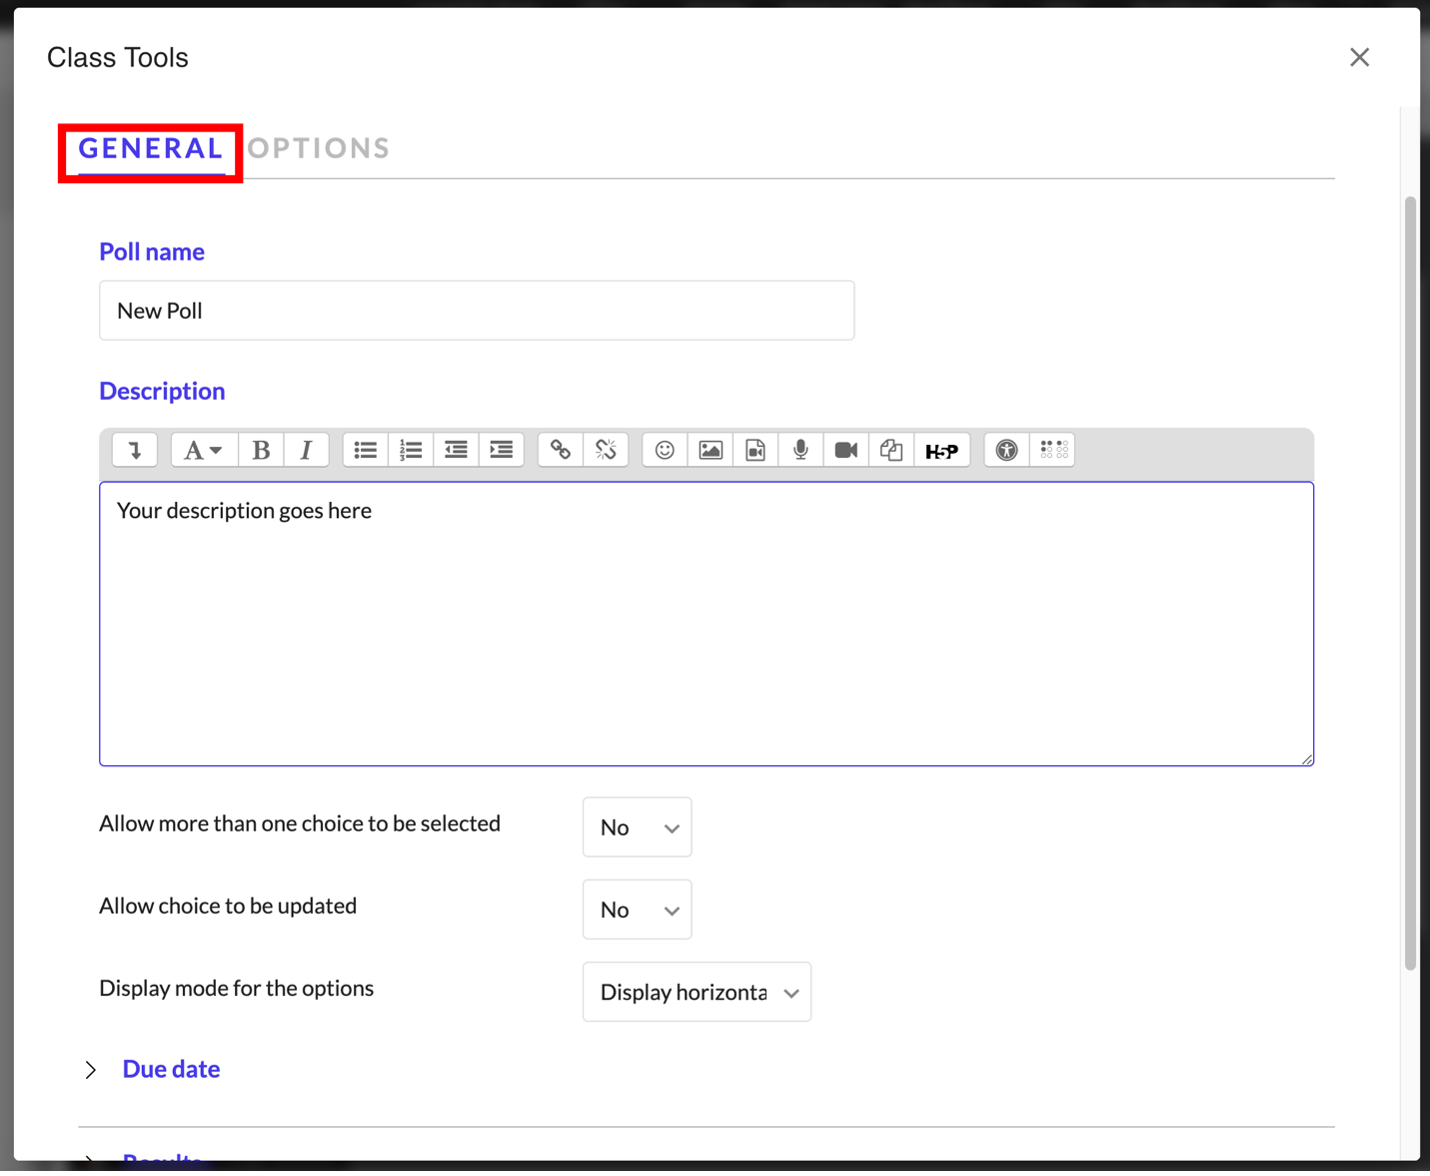
- Fill in the Poll name and Description.
- (Optional) Set these options:
- Allow more than one choice to be selected
- Allow Choice to be updated
- Display mode for the options
- Set the Due date (We recommend setting this to No due date)
- Set the Results
- Publish results
- Privacy of results
- Show column for unanswered
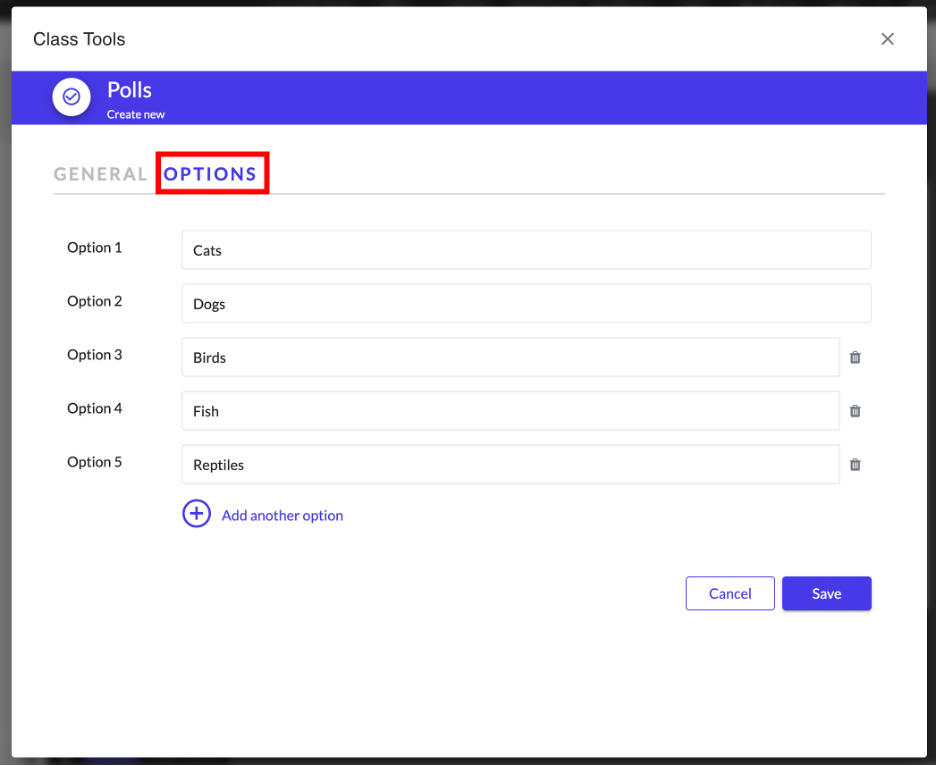
- Scroll back to the top and select the Options tab. Add the options for your poll to select. Once ready, select Save on the bottom right of the page.
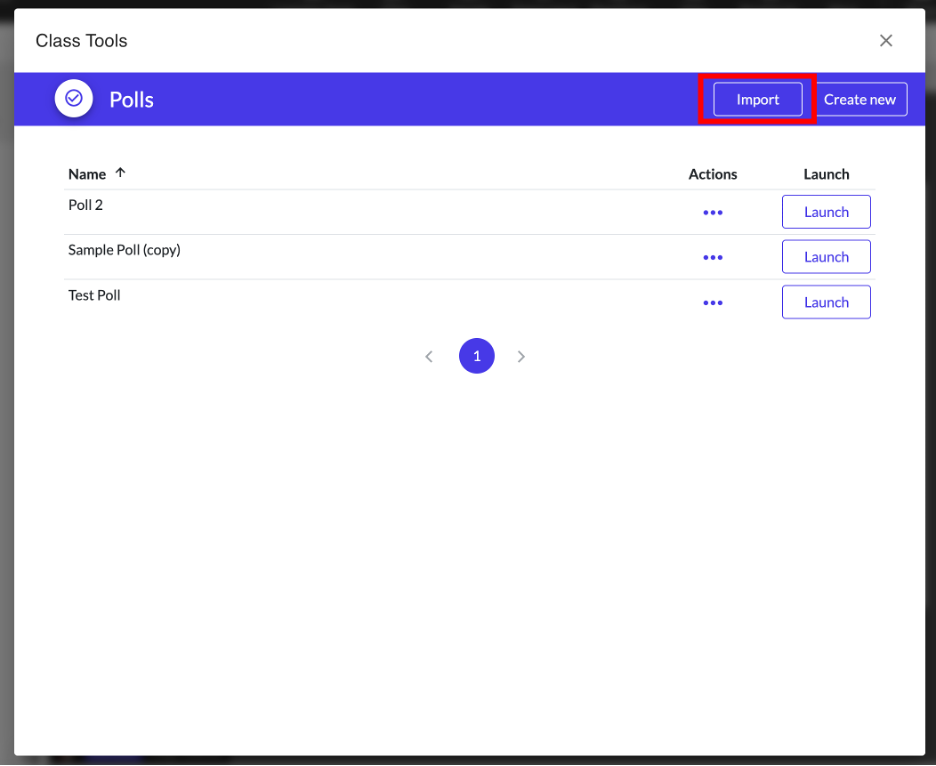
Importing Polls
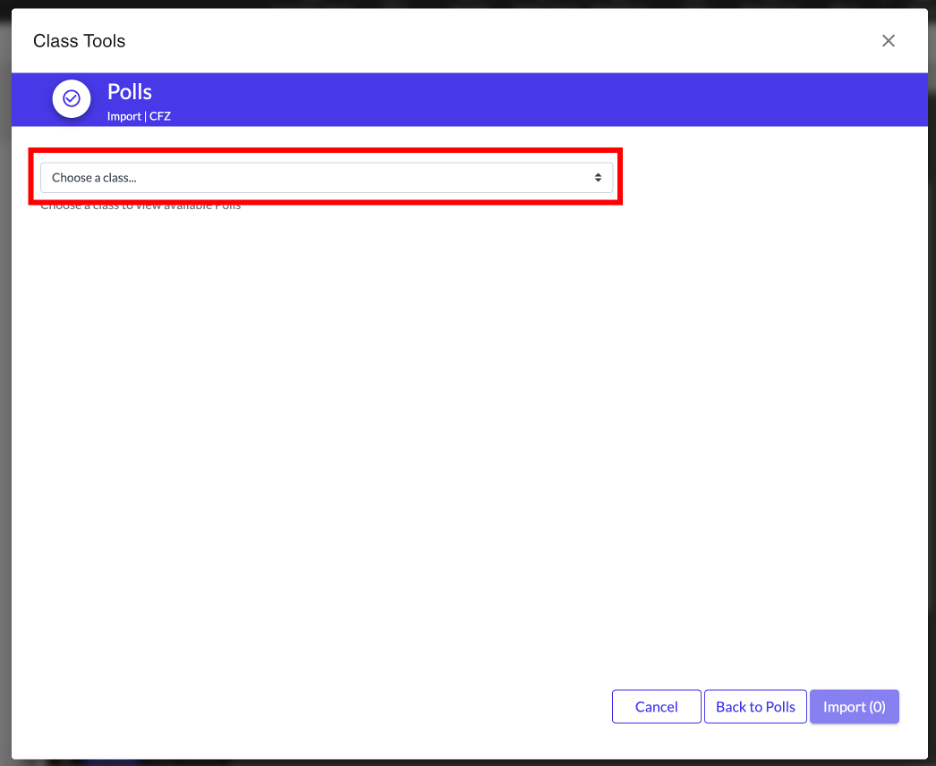
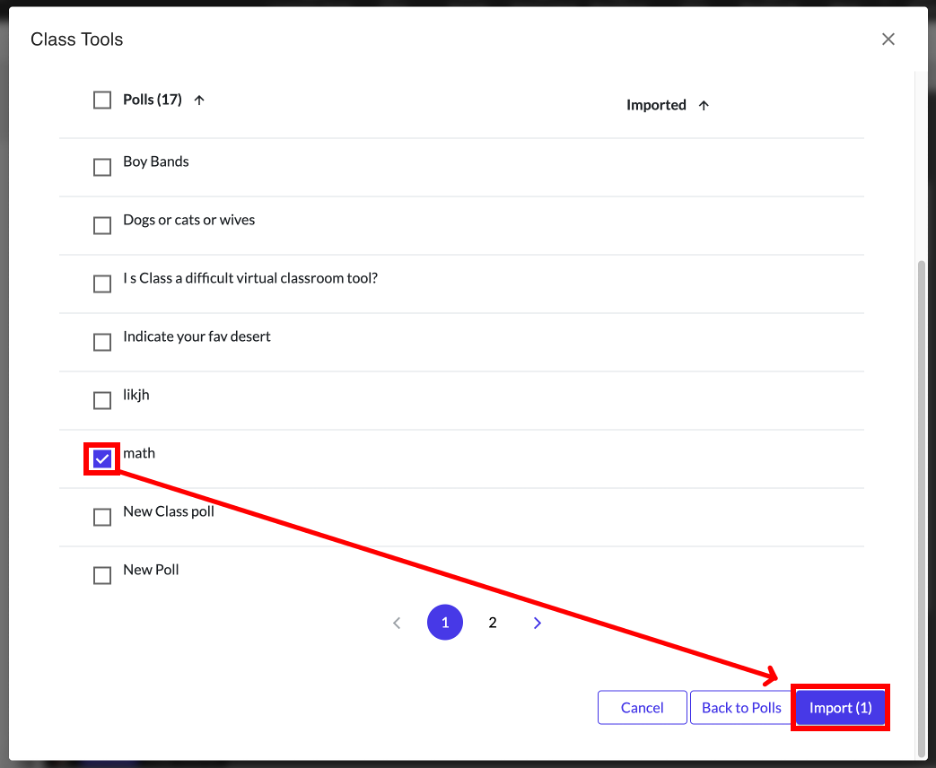
Like with surveys, Class allows you to import polls from your other Class rooms. To import click the Import button, click the Choose a class… dropdown, select the name of your other Class room and select your poll, then Tick the checkbox next to the poll and then click Import.
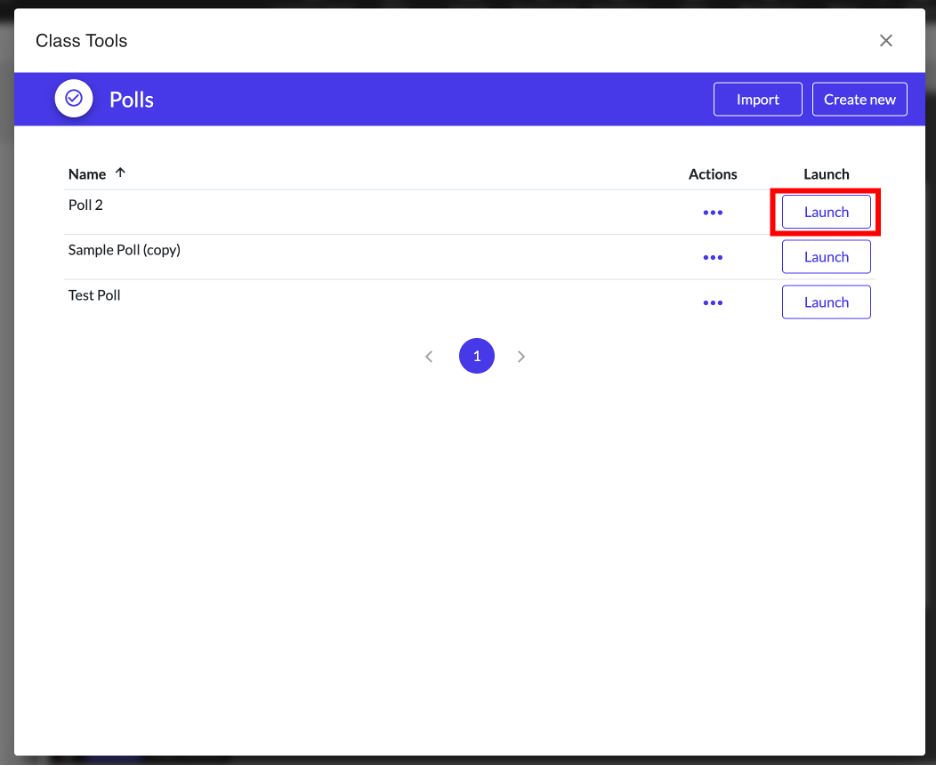
Launch a Poll
After you create or import polls you can launch them for your students to see and submit their answers. Click the Launch button next to the poll that you want your students to see.
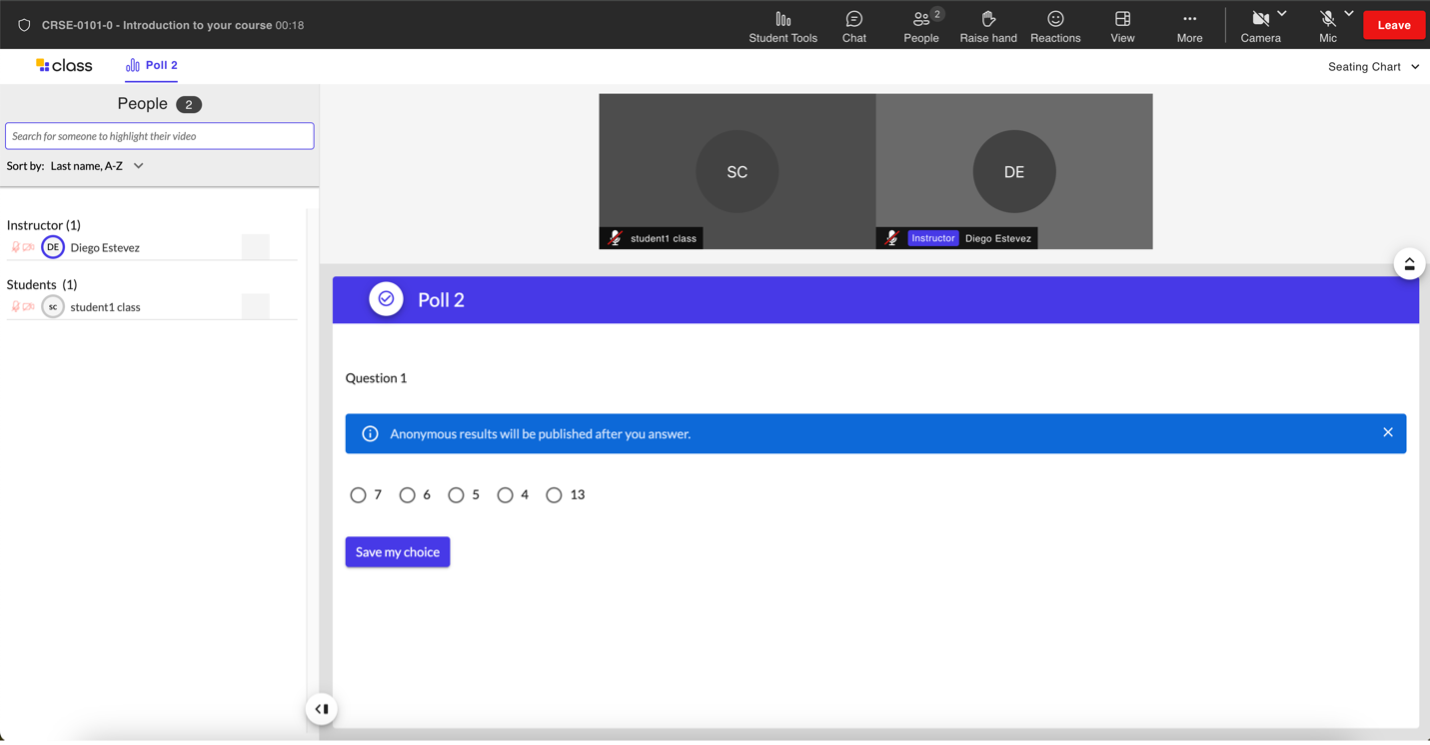
Launched polls automatically appear on everyone’s screen and it will remain there until you close it.
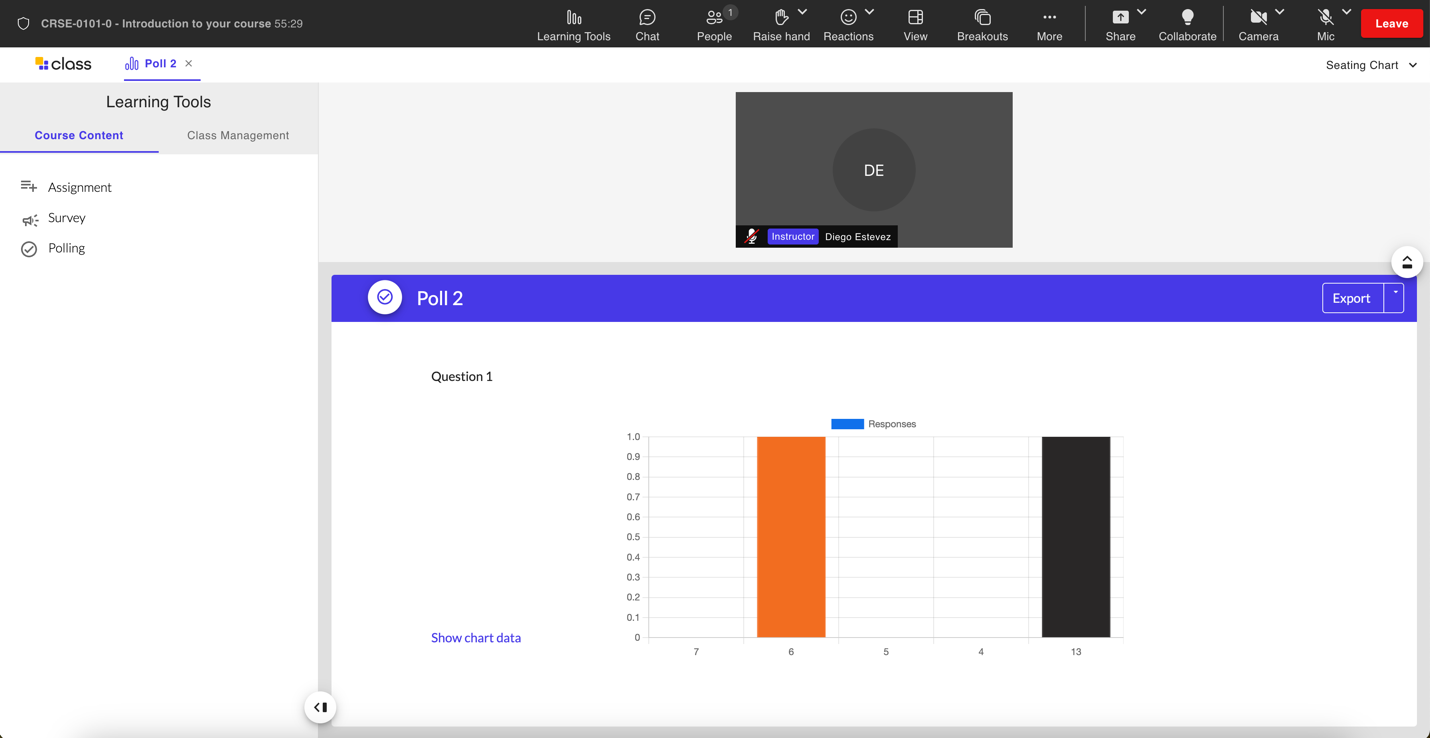
Downloading Poll Results
You can download the results of the polls you launch into either an .csv or .xls file by clicking on the Export button on the top right of the poll results screen.

Just like with surveys the instructor view will always be on the results page while students initially see the question page until they submit answer, after which that they will then see the results page. The poll results page will update automatically as soon as students begin submitting answers. To close or end a poll, close the Poll tab.
Reusing polls
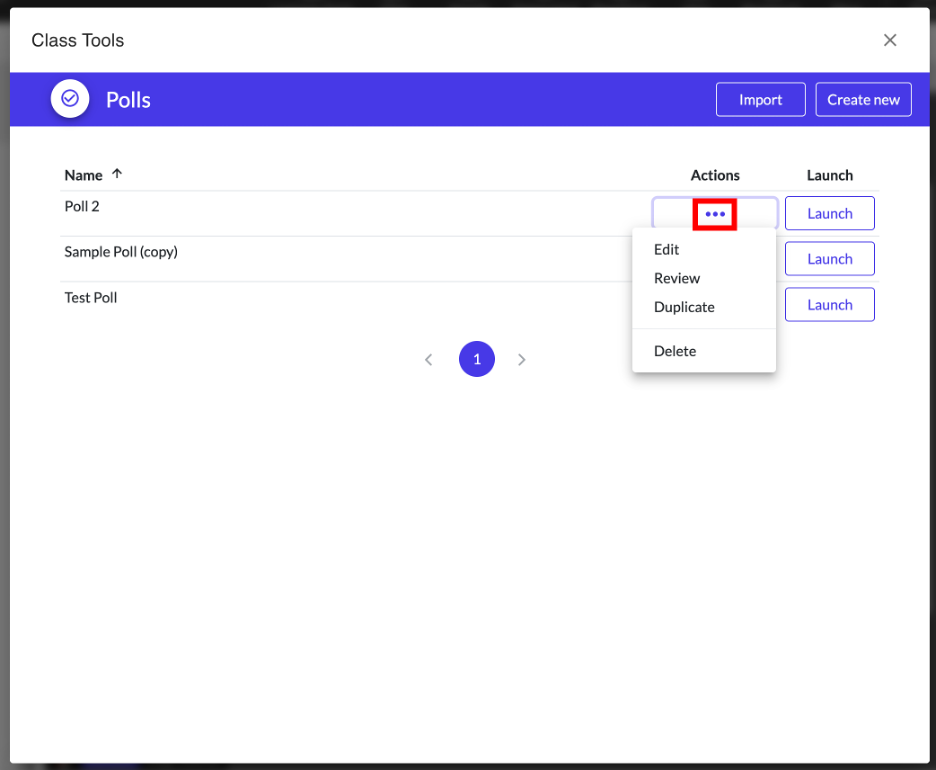
Polls also cannot be reused once students have answered them and they have been closed. Once again you will need to duplicate your poll in order to reuse it. To duplicate a poll go to the Polling tool in Course Content under Learning Tools. In the Actions columns click … next to the original poll then select Duplicate to copy the poll.
Reviewing, Editing, or Deleting polls
To review, edit or delete a poll go to the Pooling tool in Course Content under Learning Tools. Find the poll you want and then under the Actions column click … and then select either Edit to edit your poll questions or conditions, Review to see how the polllooks when view from the students perspective or Delete to delete the poll.
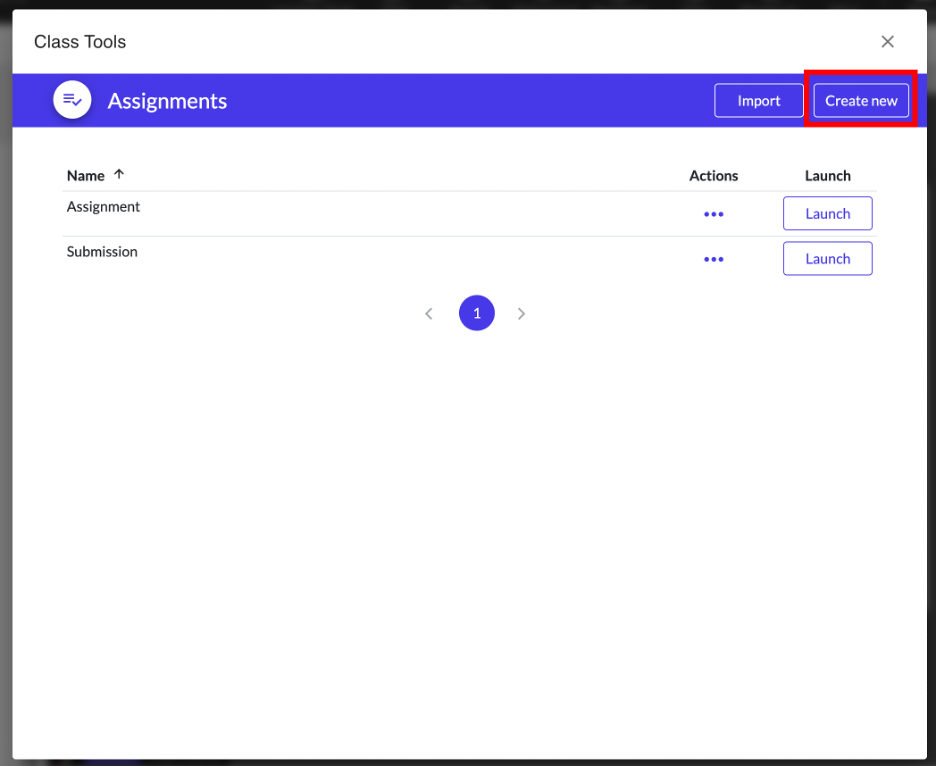
Assignments
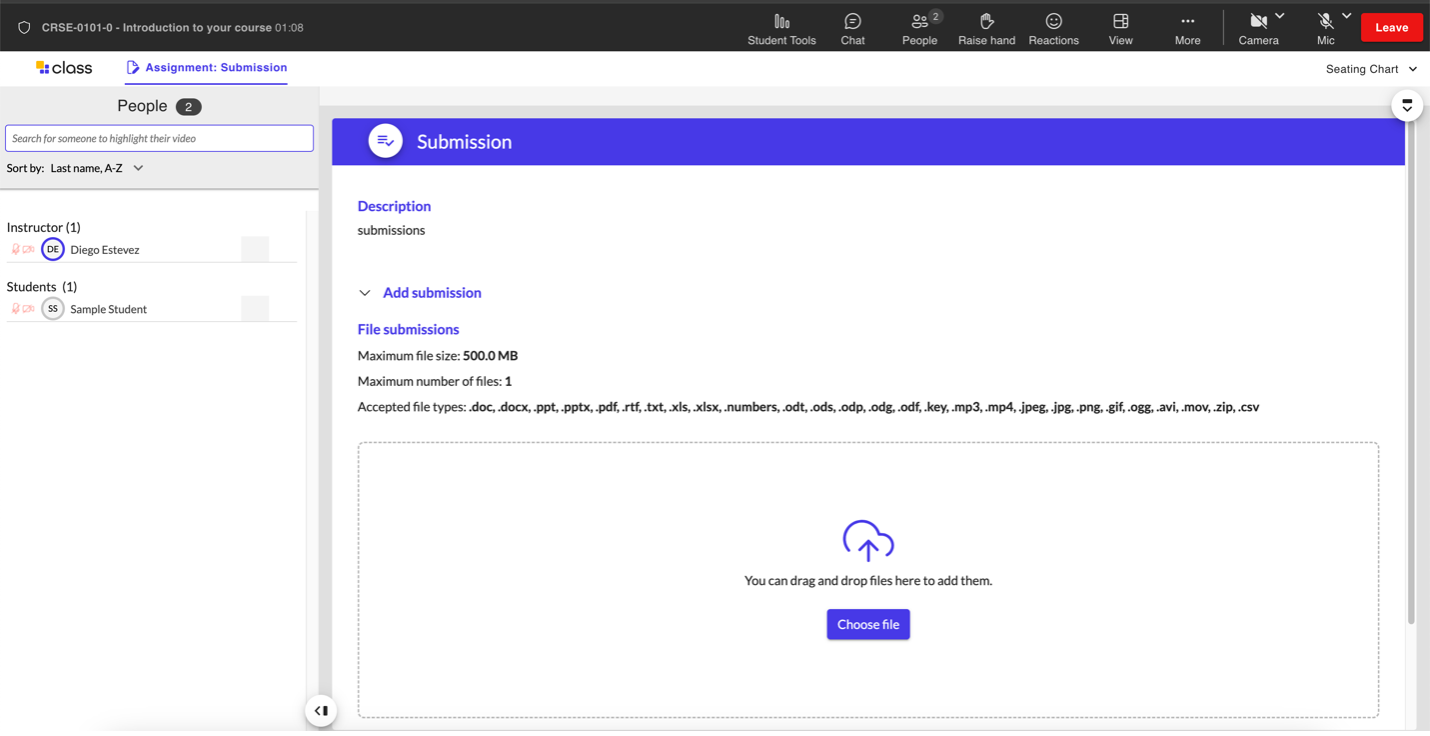
The Assignment tool is an oddity because contrary to its name it has been found inadequate for the purpose of delivering and assessing online assignments. After considerable testing with multiple faculty members, it was determined that the assignments tool was best suited not for its intended purpose but instead as a mechanism whereby students can submit files to instructors.
This odd use was in part inspired by another limitation of Class which is that its Chat feature does not allow the transfer of files or documents the same way that Teams or Zoom does. To that end, we encourage BCIT faculty to use this assignment tool as a makeshift tool for allowing students to transfer their files directly to instructors instead.

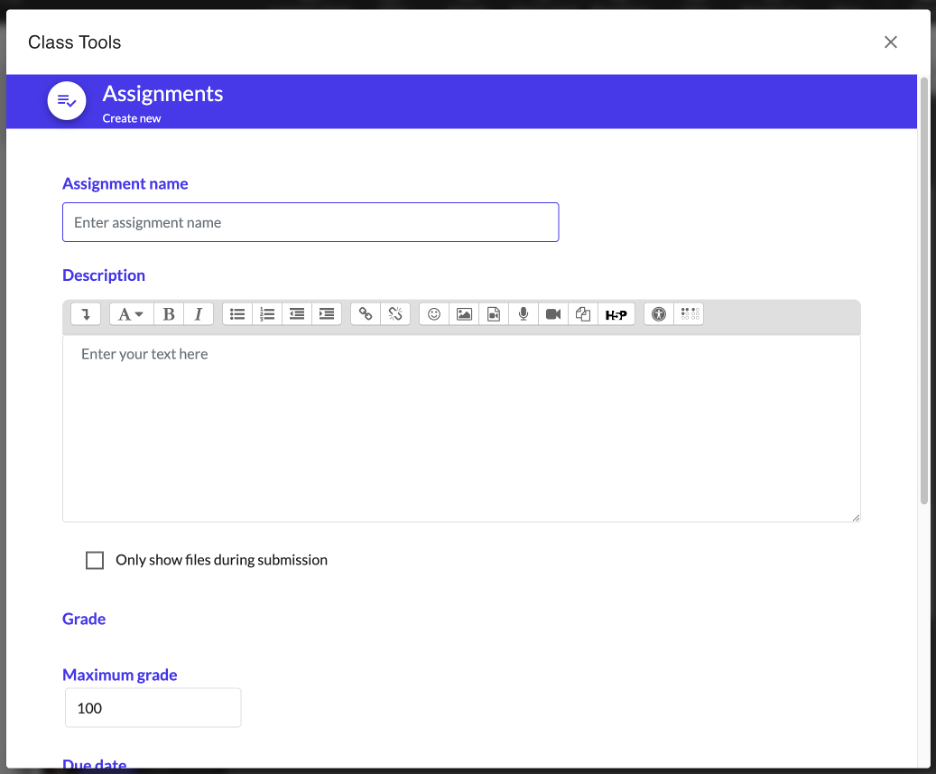
Create an assignment
- Select Assignment.
- Select Create new.
- Add an Assignment name and Description.
- Keep your Maximum grade to 100
- Set the Due date to No due date.
- Set your submission type to File submissions
- Select Save.
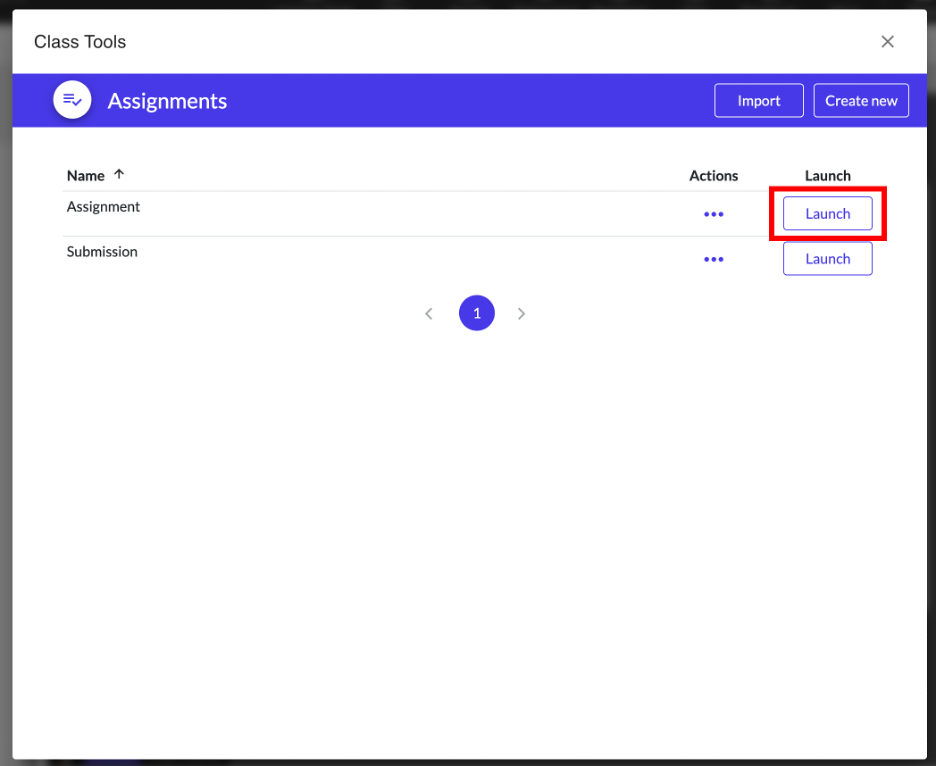
Launch an assignment
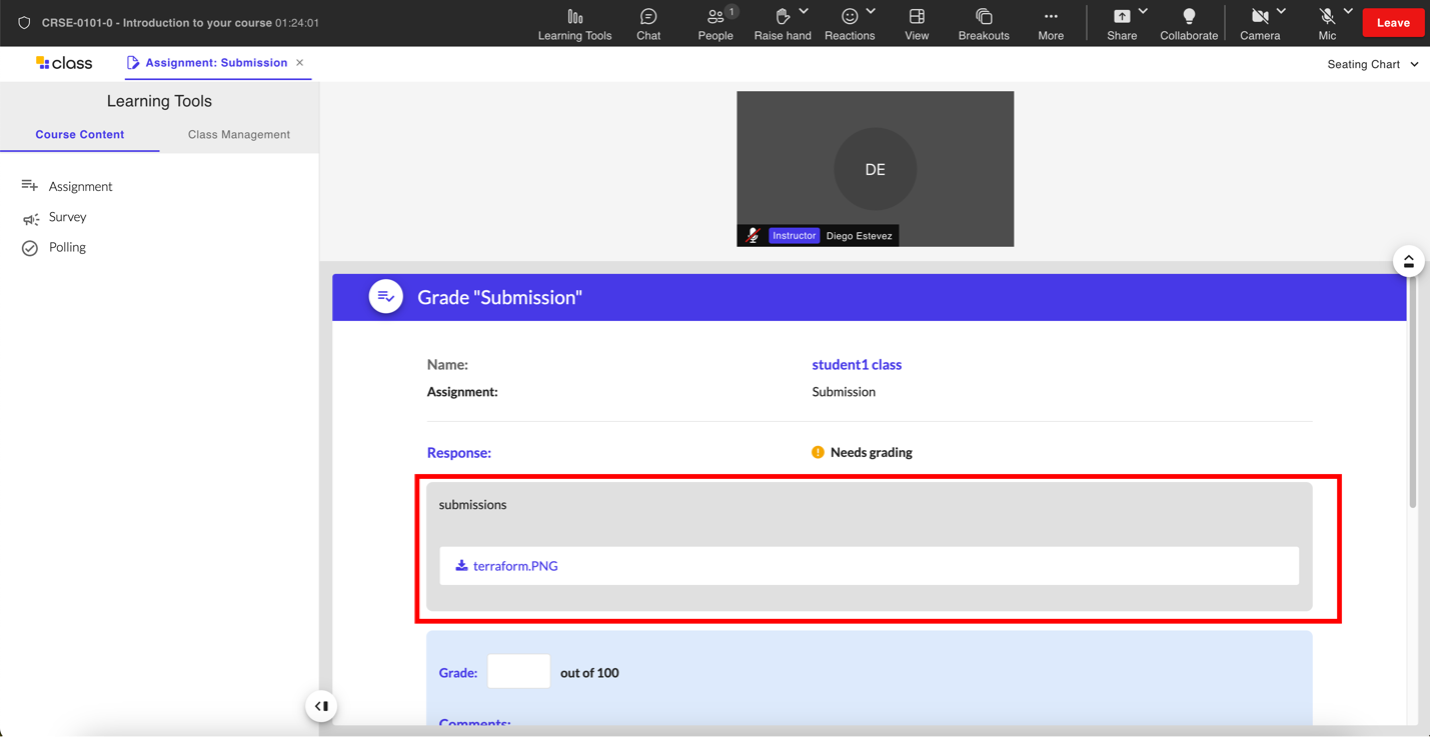
After you create an assignment, you need to launch it to your students in the Class room. Click Launch next to the assignment to release it to students. From your perspective you will now see a page titled “Submission” and underneath it are four columns: Name, Status, Last modified and Grade. Under the Status column you will see whether or not a student has submitted a file. When a student submits a file, their status will change from “No submission” to “Submitted/Not Graded”. Click on the Grade button under the Grade column to see and download file the student has submitted to you (you do not need to actually grade the student).
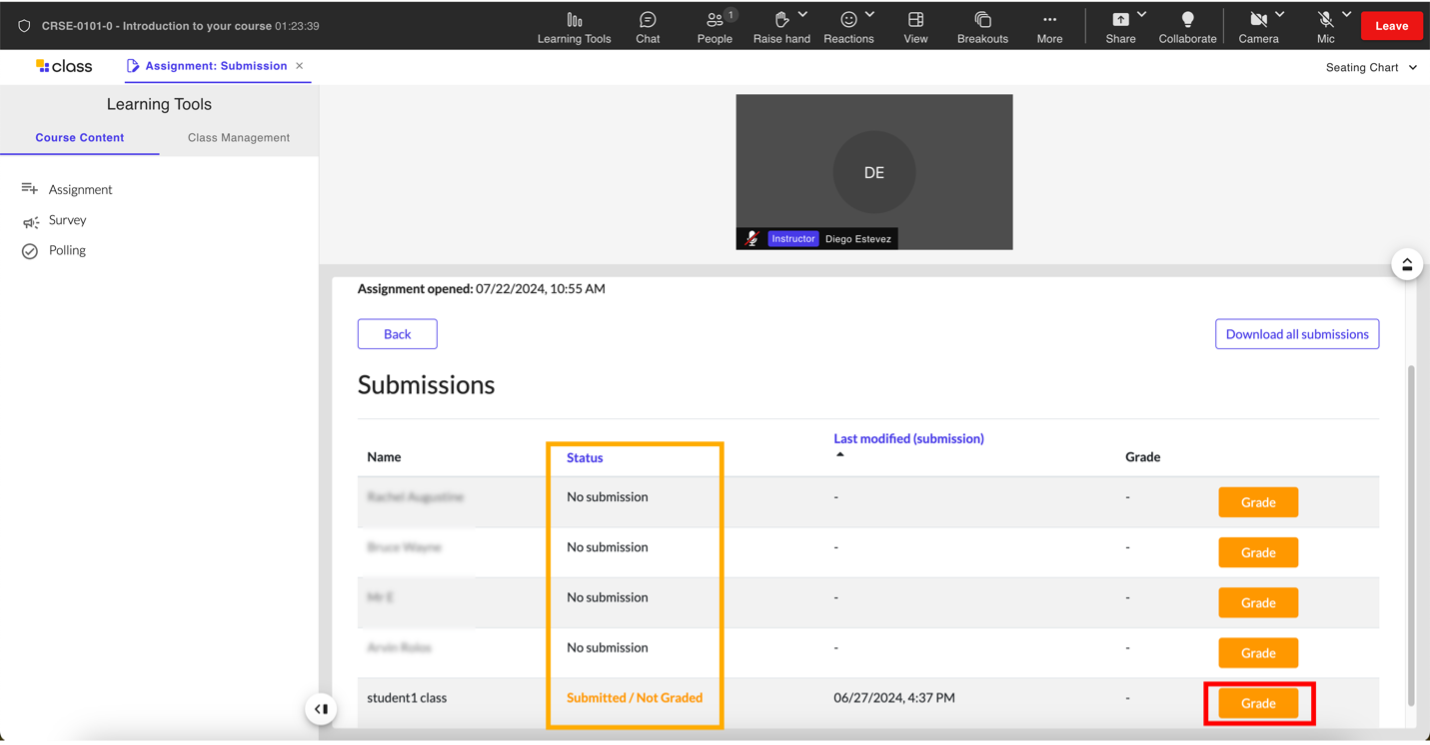
The assignment will remain on the screen until you close it. To close or end the assignment, close the Assignment tab.
Related Posts
