


- Resource
- How To - Instructors
- Quizzes – How to Create Different Types of Questions
Quizzes – How to Create Different Types of Questions
There are a variety of question types that can be used for quizzes within the Learning Hub. The system can auto-grade some of the answers while other questions need to be scored by the instructor.
For better storage, organization, and reusability, we recommend creating all quiz questions in your course’s Question Library This allows you to easily update questions and reuse them in future quizzes or courses.
This guide will walk you through creating questions directly in the Question Library.
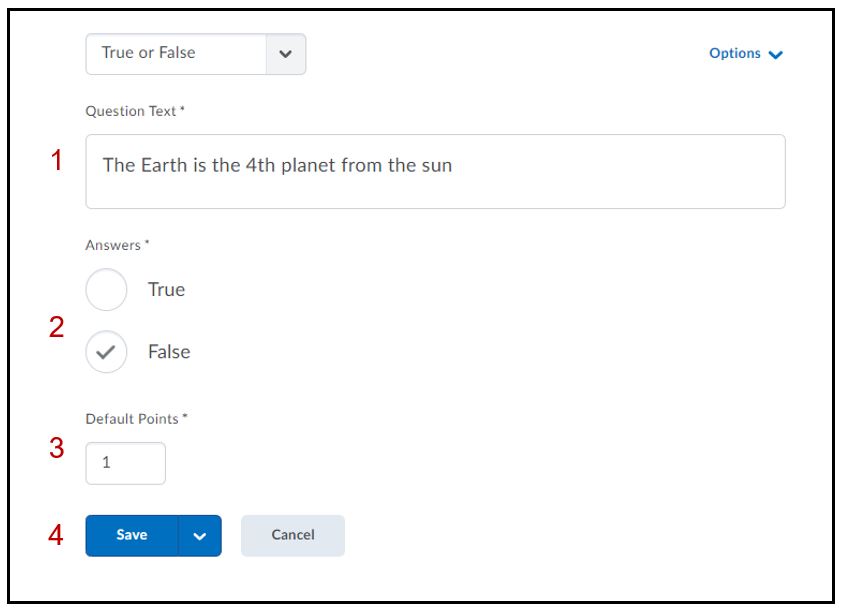
True or False (T/F)
True or False questions require learners to determine if a statement is correct or incorrect. To begin, choose True or False from the dropdown menu
- In the Question Text field, enter your True or False question.
- Select True or False as the correct Answer
- Set point value (if different from 1)
- Save
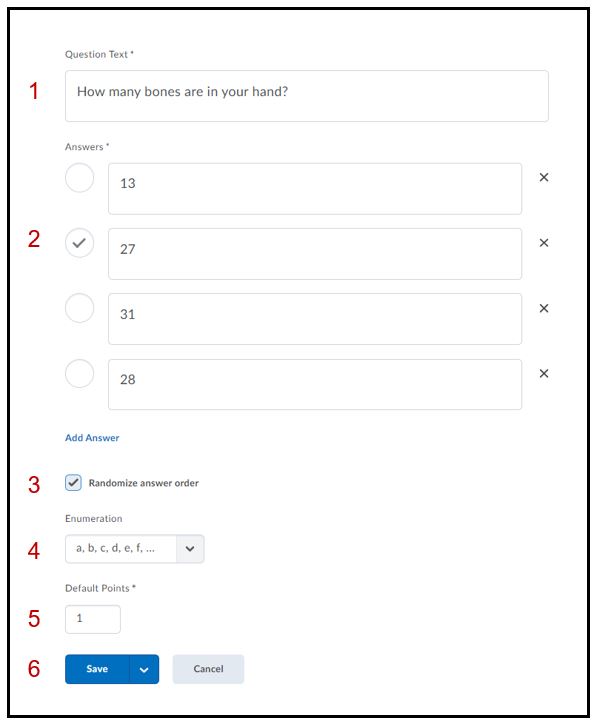
Multiple Choice (M/C)
Multiple Choice questions require learners to choose the best possible answer from a list of answers.
- Enter text for the question
- Enter text for answer choices and select the correct answer
- Select Randomize answer order (if desired), this will randomize answer choices to learners while taking the quiz
- Change enumeration (if desired. eg. A, B, C or 1, 2, 3 or i, ii, iii, etc.)
- Set point value (if desired)
- Save
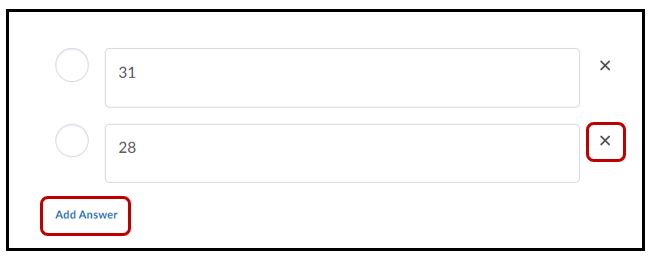
Selecting Add Answer will create another field to include another answer choice field. Selecting the ‘x‘ will delete the answer field.
Multi-Select (M-S)
Multi-Select questions require learners to choose and identify one or more correct answers from a list of answers
- Enter question into Question text box
- Enter text for answer choices and select all correct answers
- Select Randomize answer order (if desired)
- Change enumeration (if desired)
- Set point value (if desired)
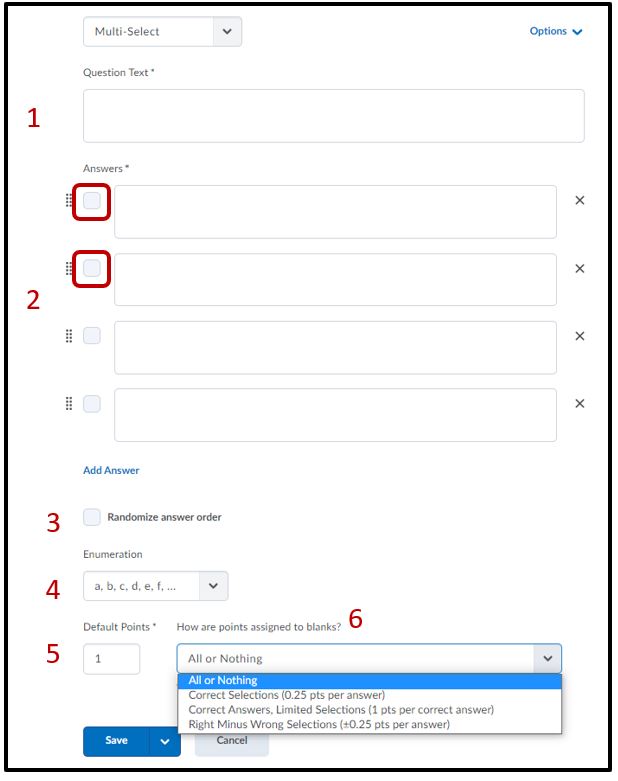
- How are points assigned to blanks?
- All or Nothing
- Learners earn full points only when all correct answers are selected and all incorrect answers are left blank. Learners cannot earn partial points.
- Correct Selections
- Points are evenly distributed across all answers. Learners earn partial points for each answer correctly selected and left blank.
- Correct Answers, Limited Selections
- Points are evenly distributed across correct answers only. The number of selections allowed is limited to the number of correct answers. Learners earn partial points for each correct answer selected.
- Right Minus Wrong Selections
- Points are evenly distributed across all answers. Learners earn partial points for each answer correctly selected and left blank. Learners lose points for answers incorrectly selected or left blank. Learners cannot receive less than 0 points.
- All or Nothing
- Save
Short Answer (SA)
Short Answer questions require learners to provide one word or brief sentence answers in response to open-ended questions.
- In the Question Library, from the New button, click Short Answer Question (SA).
- In the Question Text field, enter your short answer question details.
- In the Answers for Blank 1 field, enter your answer(s).
- From the abc drop-down list for blank 1, select the comparison method, that is Text, Case–Sensitive Text, or Regular Expression. All answers for a blank are assessed using the same comparison method.
- If you want to add more blanks, click Add Blank and enter your answer(s).
- For all additional blanks, select the comparison method.
- In the Default Points field, enter the points learners will receive for answering the question correctly.
- From the How are points assigned to blanks? drop down list, select one of the following options:
- Students will receive part marks – The default points for each blank are calculated automatically and evenly distributed.
- Students must answer all blanks correctly – The default points will only be awarded if the learner answers all blanks accurately.
- From the Options drop-down list, do one of the following:
- To add overall feedback for the answer, select Add Feedback.
- To add a hint to the question, select Add Hint.
- To add a short description to the question, select Add Short Description.
- To verify your question, click Preview.
- Click Save.
Note: As a best practice, D2L recommends that the weight of each possible solution equals 100% if you require only one answer. If your question requires multiple answers, and each answer has several possible solutions, we recommend that the combined weight of each answer’s most correct solution be equal to 100%.
Multi-Short Answer (MSA)
Multi-Short Answer question require learners to answer a multi-solution question and add their answers into individual text boxes. The answer provided by a learner in each text box is checked against each possible answer stored in the Answer fields.
MSA questions differ from SA questions in that the MSA question enables you to create multiple answer boxes, which all relate to one answer set; short answer questions also support multiple answer boxes, but each require a distinct set of possible answers. The SA question type is ideal if you need to create a multi-part question that cannot share the same answer pool.
- In the Question Library, from the New button, click Multi-Short Answer Question (MSA).
- In the General area, enter your multi-short answer question details.
- In the Options area, do the following:
- In the Input boxes field, enter the number of required answer fields you want your question to have. You can assign the number of rows and columns for each answer field.
- In the Answer fields, enter the correct answers for your question, the weight for each answer (you can set different weights if some solutions are more correct than others), and how you want the answers to be evaluated.
- To assign more possible answers for the question, click Add Answer.
- To verify your answer, click Preview.
Fill in the Blanks (FIB)
Fill in the Blanks questions require learners to fill in one or more missing words in an incomplete sentence, statement, phrase, list, or key terminology.
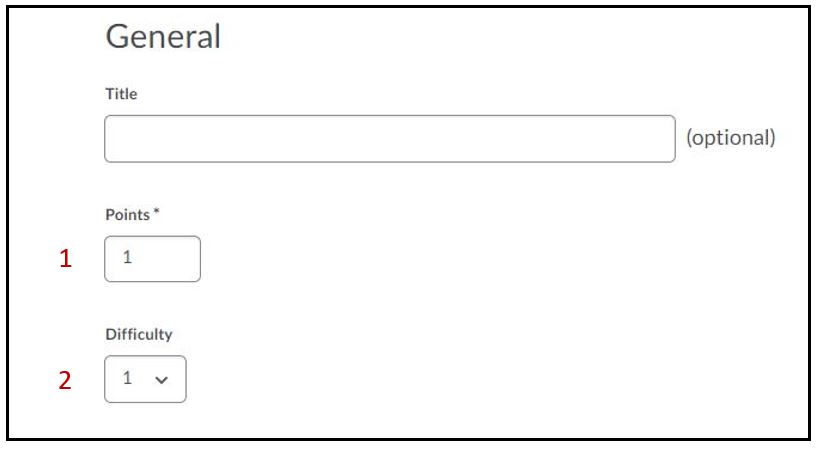
- Assign point value for the question
- Optional: Enter the difficulty level
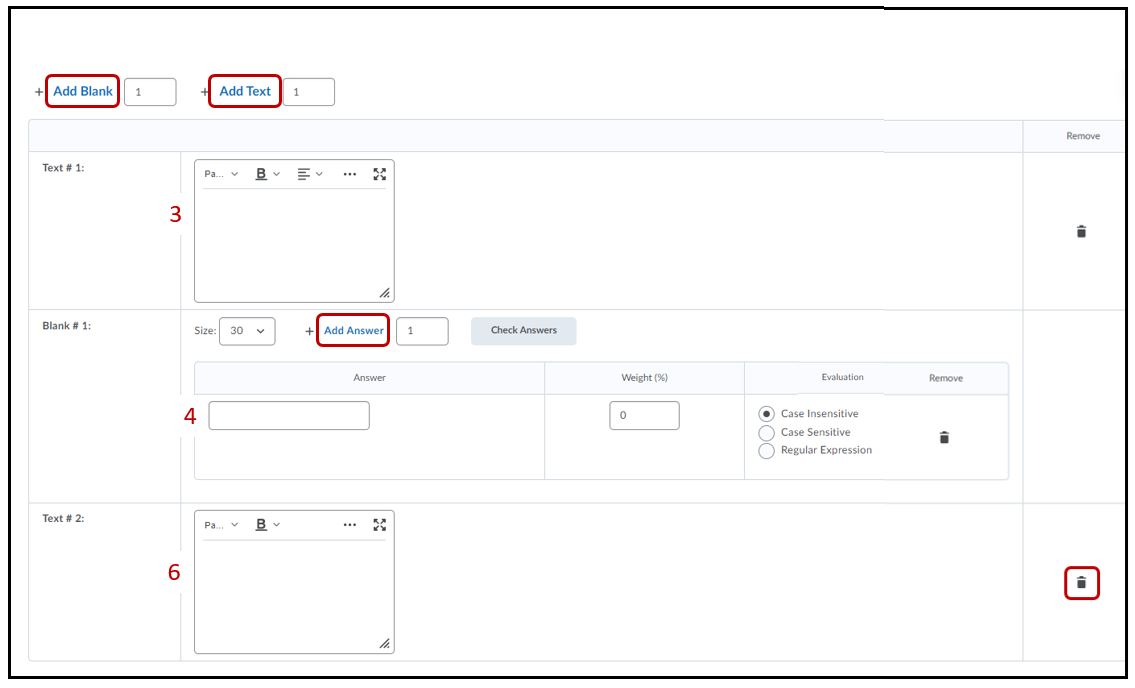
- Enter question text in Text #1 field
- Enter answer in Blank #1
- Optional: change the size of the answer field for learner
- Set the percentage weight for the answer
- Enter remaining text in Text #2 field if a closing sentence is needed or remove the text field by selecting the trash can icon
- Save and Preview
Matching (MAT)
Matching Questions require learners to choose from a set of possible match choices from drop-down lists and correctly pair them with related items. This question type enables you to assess users’ recognition of information and demonstrate comprehension of specific relationships.
To create Matching Questions
- In the Question Library, from the New button, click Matching Question (MAT).
- In the General area, enter your matching question details.
- In the Choices area, do the following:
- Select the grading method for the question.
- In each Value field, enter a choice.
- To add additional values for the question, click Add Choice.
- In the Matches area, do the following:
- In each Value field, enter a choice.
- To add additional matches for the question, click Add Match.
- From the drop-down list for each matching value, select the corresponding Correct Choice.
- To verify your question, click Preview.
Ordering (ORD)
Ordering Questions require learners to arrange a series of items into a correct sequence or order.
- In the Question Library, from the New button, click Ordering Question (ORD).
- In the General area, enter your ordering question details.
- In the Options area, do the following:
- Select your grading method.
- In each Value field, enter a choice. To add more values, click Add Item.
- From the Correct Order drop-down list for each value, set the order of the values. The first value in the correct order should be “1”.
- To verify your question, click Preview.
Arithmetic (2+2)
Arithmetic questions enable you to assess users’ knowledge and comprehension of mathematics and number theory. You can ensure each respondent receives a unique question by including variables enclosed with curly braces that randomly generate numbers within the problem. For example, if you set variables x, y, and z with a Min 1 to Max 5 number range in 1-step increments, the question “You have {x} green marbles, {y} red marbles, and {z} blue marbles. How many marbles do you have in total?” will randomly generate a rational number (1, 2, 3, 4, 5) for {x}, {y}, and {z}.
As a best practice, D2L recommends that you create written response (WR) question types for arithmetic problems that require users to demonstrate their calculations and show their work.
- In Question Library, from the New button, click Arithmetic Question (2+2).
- In the Title field, enter an optional title for your question.
- In the Points* field, enter the number of points a learner will receive for answering the question correctly.
- Set the Difficulty level for the question.
- In the Question Text field, enter your arithmetic question text.
Note: The character limit is 512. - To add an image to your arithmetic question, click Insert an Image and select the image you want to add and enter a description for the image.
- To enable learners to add attachments to support their answers, select the Allow attachments to support answers check box.
- Enter your arithmetic question Formula using the following supported operations, functions, and constants.
- In arithmetic questions, use answer precision to limit the number of acceptable decimal places allowed in a response. You can require that correct answers contain a specific number of decimal places.
- From the Answer Precision drop-down menu, select the number of acceptable decimal places allowed in a response and select the enforce precision check box to require correct answers to contain this specific number of decimal places.
- Use Tolerance levels to accept near-accurate, estimated, or rounded answers.
- To assess if answers include correct units of measurement, enter a unit type (mm, cm, grams, inches, etc.), and set one of the following Evaluation Options:
- Case Insensitive – Auto-grading searches for a matching character pattern in the answer text with or without letter case correctness.
- Case Sensitive – Auto-grading searches for a matching character pattern in the answer text that must have letter case correctness.
- Regular Expression – Auto-grading uses meta-characters to search for one or more matching strings in the answer text’s character pattern. What you set as meta-character parameters helps determine letter case sensitivity.
- To assign a weighted points value to the measurement unit, from the Worth: drop-down menu, select a percentage.
- In the Variables area, do the following:
- Create any variables you want to use with your question by giving the variable a Name, a minimum value in Min, and a maximum value in Max.
- Set the number of decimals to provide in the Decimal Places drop-down list.
- To set the system’s incrementing steps as it generates numbers from the range set by the Min and Max fields, in the Step field, enter a number.
- Enter a Question Hint and Question Feedback.
- To verify your question, click Preview.
- Click Save.
Significant Figures (x10)
Significant Figures questions require learners to answer in scientific notation and provide solutions that contain a specified number of significant figures. Math and science courses commonly use this question type.
- In Question Library, from the New button, click Significant Figures (x10).
- In the Title field, enter an optional title for your question.
- In the Points* field, enter the number of points a learner will receive for answering the question correctly.
- Set the Difficulty level for the question.
- In the Question Text field, enter your arithmetic question text.
- To add an image to your arithmetic question, click Insert an Image and select the image you want to add and enter a description for the image.
- To enable learners to add attachments to support their answers, select the Allow attachments to support answers check box.
- Enter your arithmetic question Formula using the following supported operations, functions, and constants:
Likert Questions (LIK)
Likert Questions require learners to respond with subjective information such as personal opinions, knowledge, abilities, and attitudes. Likert questions enable you to create surveys that evaluate the intensity of respondents’ feelings towards statements presented to them.
There are seven measurement scales available to Likert questions: One to Five (1 to 5), One to Eight (1 to 8), Agreement Scale (Disagree–Agree), Satisfaction Scale (Dissatisfied–Satisfied), Frequency Scale (Never–Always), Importance Scale (Unimportant–Important), and Opposition Scale (Oppose–Support).
You can only access Likert questions through the Surveys tool and Question Library. Similar to self assessments, all question types you import into surveys automatically omit point value and difficulty level indicators.
- In the Question Library, from the New button, click Likert Question (LIK).
- In the General area, enter your Likert question details.
- In the Questions area, do the following:
- Select the Scale you want the question to use.
- In each Value field, enter a statement. To include additional statements, click Add Option.
- To verify your question, click Preview.
Reference – D2L Brightspace – Creating Question Library questions
How to Format a Quiz Word File for Respondus Campus Quiz tool
Related Posts
