


- Resource
- Class for Teams
- Class for Teams – Collaborate – Whiteboards
Class for Teams – Collaborate – Whiteboards
Whiteboards are a multipurpose tool which are typically used for either diagraming something on a blank canvas or annotating pages that you upload from PDF files. Whiteboards can be launched with either individual or group controls making them a useful tool for brainstorming ideas. Whiteboard also persist making them easy to revisit or build on concepts in successive sessions.
Create a New Whiteboard
To create a new whiteboard, start by selecting Collaboration and then Whiteboards.
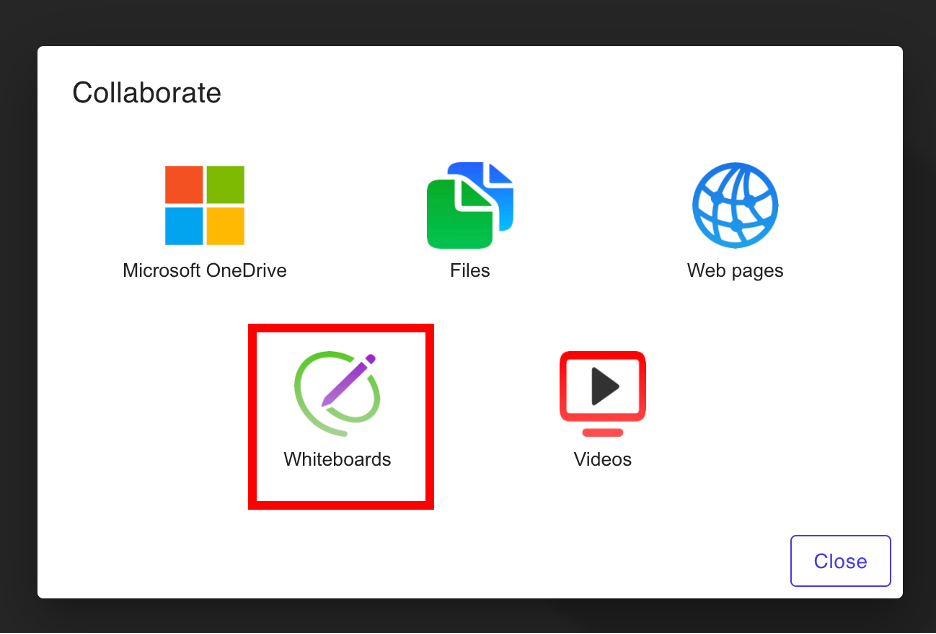
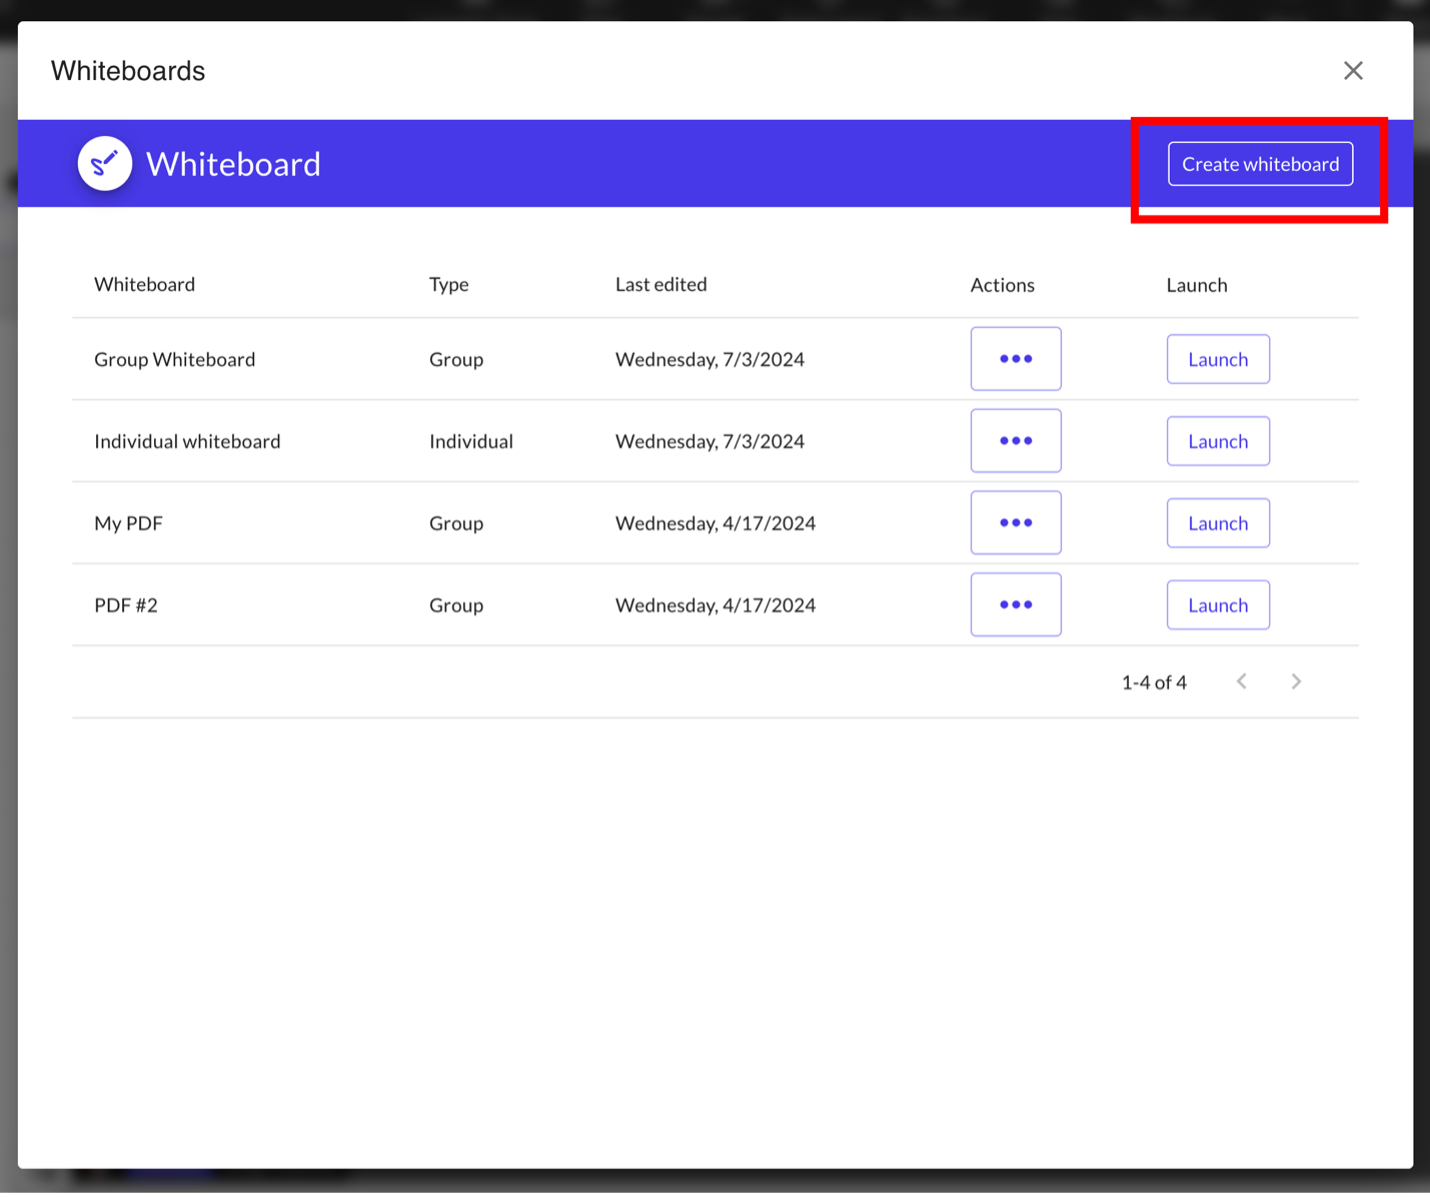
A dialogue box should appear, click on the button labelled Create Whiteboard.
A secondary dialogue box with the title Whiteboard settings should now appear. Give your new whiteboard a name, then configure the desired settings.
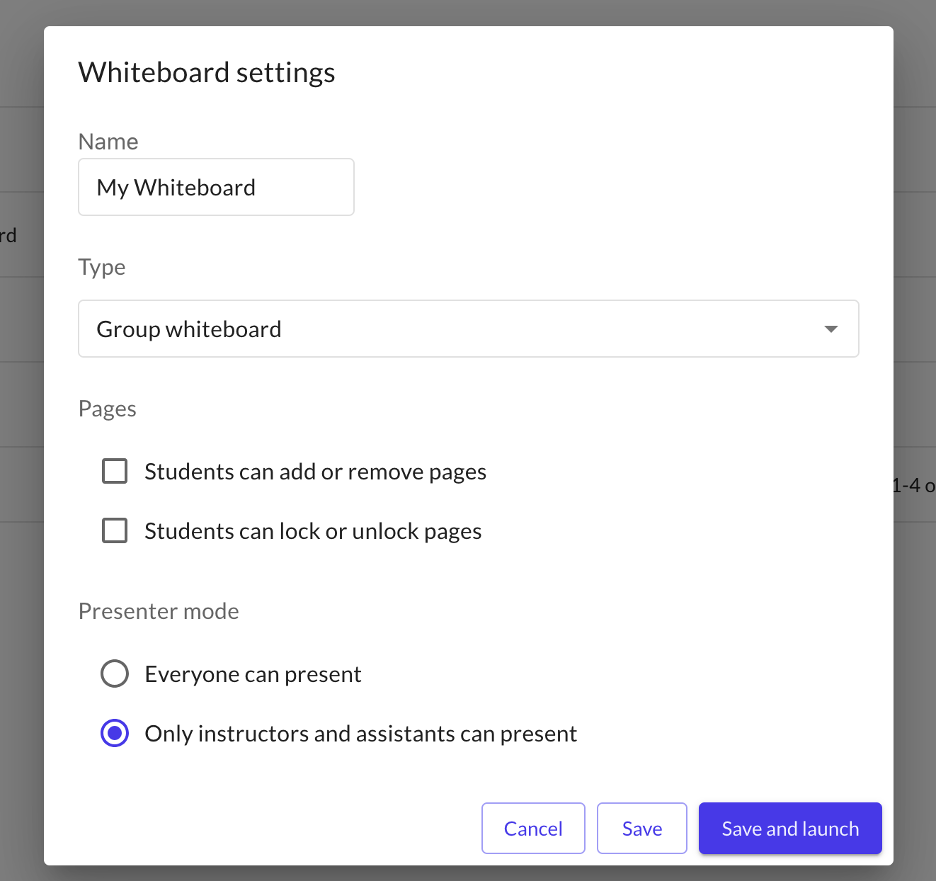
Whiteboard Settings
You can adjust the settings at any time by selecting the pencil icon next to a Whiteboard
Type
- Group — This option will create a single whiteboard that students and instructors can both see and work off of. Using this option will allow you to share a single whiteboard with the class that you and your students can edit in real time.
- Individual — This option will create individual whiteboards for everyone in the classroom, as well as a control board for the instructor. Each whiteboard is unique to each individual in the class and students cannot see or edit each other’s whiteboards. Instructors however can see all the individual whiteboards of students and edit them. The control board that instructors have access to also allows them to inject any annotations that they write into all the individual whiteboards of students.
Pages (Group Whiteboards only)
- Students can add or remove pages — When ticked this option will determines whether students can freely add or remove pages to the shared whiteboard.
- Students can lock or unlock pages — When ticked this option determines whether students can lock or unlock pages from being edited
Presenter Mode
Determines who is allowed to present their whiteboard to the whole class. To present, the presenter must click on the Present button near the top of their whiteboard. Depending on whether this option is set to Everyone can present or Only instructors and assistants can present either this button will be visible to everyone in the class, or only instructors will be able to see it.
When you are finished creating your whiteboard click Save
Sharing Whiteboards
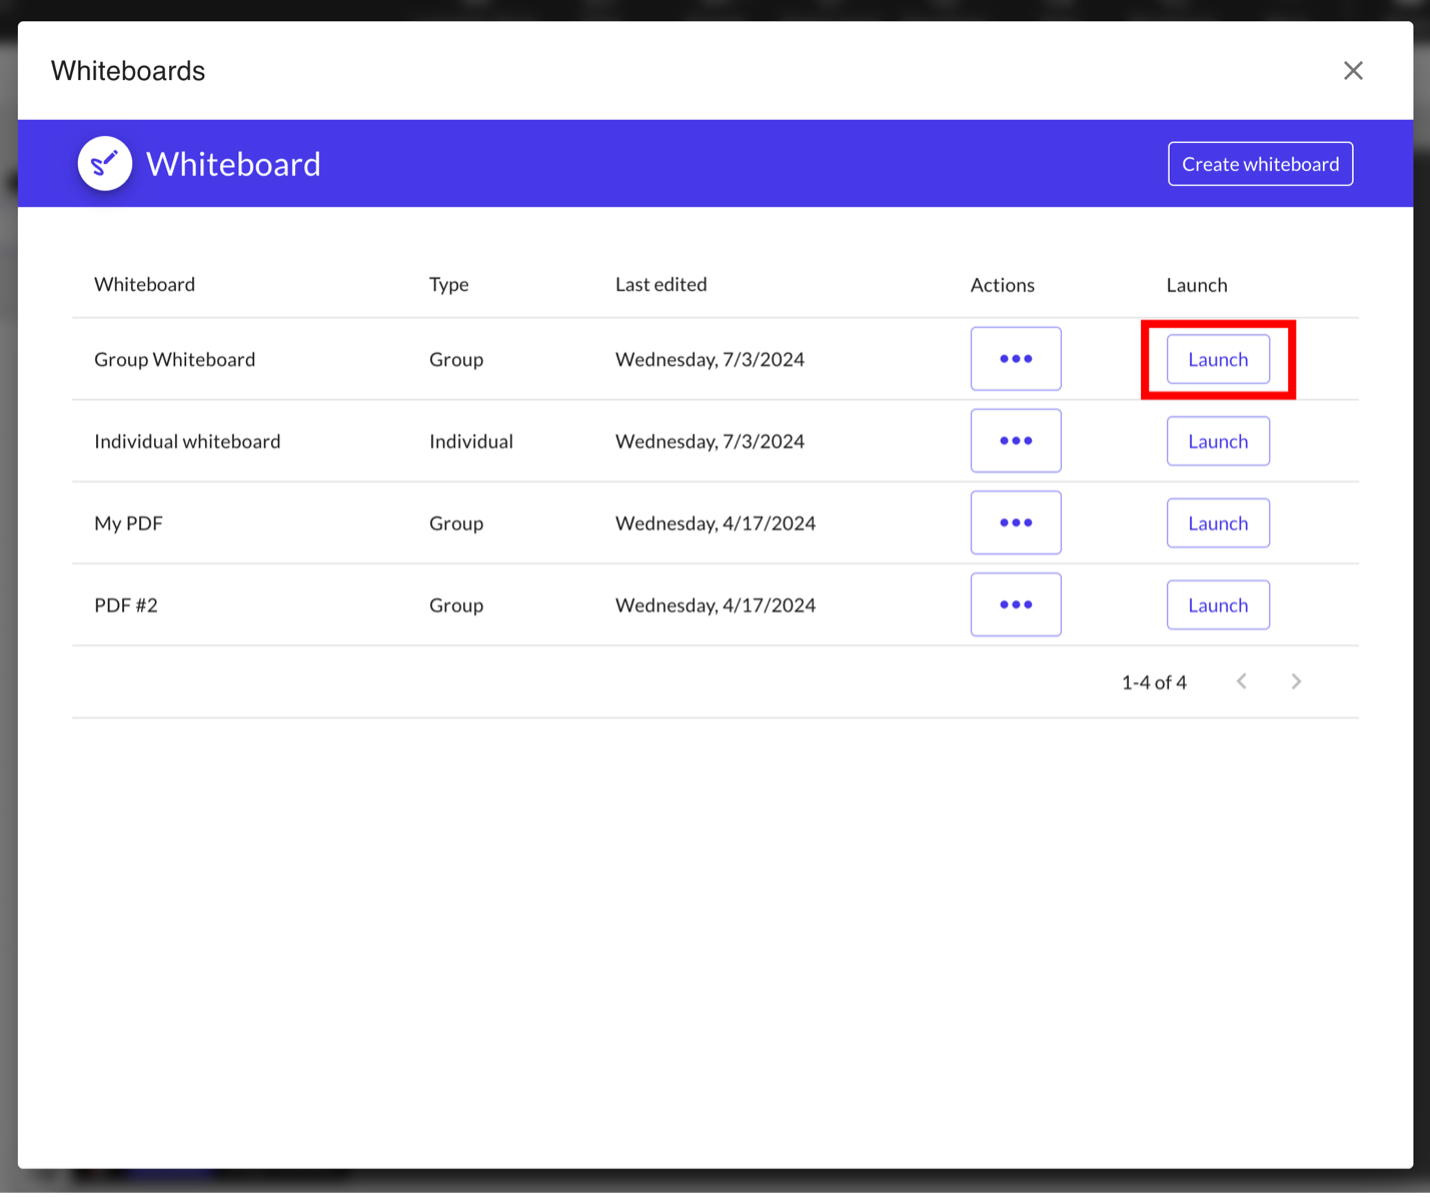
To share a whiteboard, click on Collaborate and Whiteboards. Next, click on Launch to share your whiteboard with the rest of the Class.
Editing and Deleting Whiteboards
Editing whiteboards
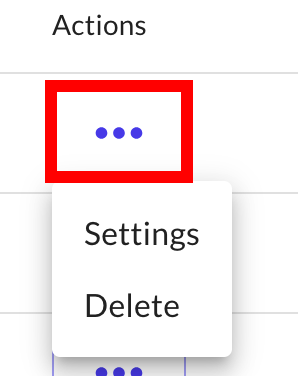
To edit a whiteboard, click on Collaborate and Whiteboards. Next, click on … under the Actions column for your whiteboard and click on Settings. Depending on whether your whiteboard is a Group or Individual whiteboard, you can alter the pages and presenter options or the presenter options only for your whiteboard.
Deleting whiteboards
To delete a whiteboard, click on Collaborate and Whiteboards. Next, click on … under the Actions column for your whiteboard and click on Delete. This action will delete your whiteboard.
Using the Whiteboard
Whiteboards can broken down into two control schemes: Menu controls and Whiteboard controls.
Menu Controls
Menu controls are found in the navigation bar of whiteboards and are responsible for controlling the settings of your whiteboard.

- Access the Pages Menu – Add, Remove, Delete, or Lock Pages. Edit the Control board.
- Present – Start or stop presenting. When presenting everyone in the Class will see your Whiteboard
- Allow learner editing –Turn on Allow learner editing to give everyone permission to write on the board. Collaborate with your class. Want pencils down? Use the Allow participant editing toggle again to turn it off.
- … – Adjust Whiteboard settings
Whiteboard Controls
Whiteboard controls are found on the individual whiteboard pages themselves are responsible for controlling the actual elements shown on the individual pages.

-
Zoom in and out
-
From left to right:
-
Hand – Move around the board without selecting
-
Pointer – Select whiteboard elements
-
Rectangle Tool — create a rectangle
-
Diamond Tool — create a diamond
-
Circle Tool — create a circle or oval
-
Arrow Tool — draw an arrow
-
Line Tool — draw a line
-
Draw Tool — draw freeform
-
Text Tool — write text
-
Math Symbols — input a Math symbol
-
-
View keyboard shortcuts
-
Clear the current board (select Clear all to confirm)
Troubleshooting Whiteboards
The section below contains some common problems you may experience with Whiteboards and how to resolve them.
Unable to Load
Symptoms:
- The whiteboard is not loading.
- A blank screen is displayed.
Solutions:
- Check Internet Connection: Ensure you have a stable internet connection.
- Clear Browser Cache (Web app): Sometimes, cached data can cause loading issues. Clear your browser cache and try reloading the page.
- Disable Browser Extensions (Web app): Some extensions might interfere with the whiteboard. Try disabling extensions and reloading the page.
- Update Browser (Web app): Ensure your browser is up-to-date. The whiteboard works best on the latest browser version.
Performance Issues (Lagging or Slow Response)
Symptoms:
- Drawing or interactions are slow.
- The whiteboard lags when adding elements or collaborating.
Solutions:
- Close Unnecessary Tabs (Web app): Too many open tabs can consume system resources.
- Limit the Number of Elements: Too many elements on the whiteboard can slow down performance. Consider separating your drawing into smaller parts or splitting it over multiple pages.
- Use a Modern Device: Older devices might struggle with performance. Using a more recent device can improve responsiveness.
- Optimize Your Network: Ensure you have a strong and stable internet connection. Consider using a wired connection for better performance.
Collaboration Issues
Symptoms:
- Changes made by collaborators are not visible.
- Real-time collaboration is not working.
Solutions:
- Check Internet Connection: A stable connection is crucial for real-time collaboration.
- Refresh the Page: Refreshing the page can sometimes resolve synchronization issues.
- Check Permissions: Ensure collaborators have the correct permissions to view and edit the whiteboard.
Drawing or Element Issues
Symptoms:
- Unable to draw or add elements.
- Elements are not behaving as expected.
Solutions:
- Ensure Correct Tool Selection: Make sure you have selected the correct tool from the toolbar.
- Check for Locked Elements: Some elements might be locked. Check if the element is locked and unlock it if necessary.
- Reset Tool Settings: Sometimes, custom tool settings can cause issues. Reset the tool settings to default.
Other Issues
- Toggling “Allow Learner Editing” Pushes Users to Initial Whiteboard Page
- Image Display Discrepancy Between Teacher and Student Views on Web
- Error Codes: 8015, 8016, or 8017
- If reloading the meeting does not resolve the issue, please open a support case and include the error code with steps to reproduce.
For any other issues related to Whiteboards please contact Class Support
If any issues above persist with your whiteboards after trying out the suggested solutions, please contact support through the Product feedback option which can be found under the More tool inside your classroom.

Related Posts
