


- Resource
- Uncategorized
- Kaltura – Learning Hub Overview
Kaltura – Learning Hub Overview
Kaltura is a suite of multimedia tools that makes integrating video effortless inside the Learning Hub. It gives instructors quick, flexible options to create, upload, and share media that boosts engagement and brings course content to life.
Accessing Kaltura
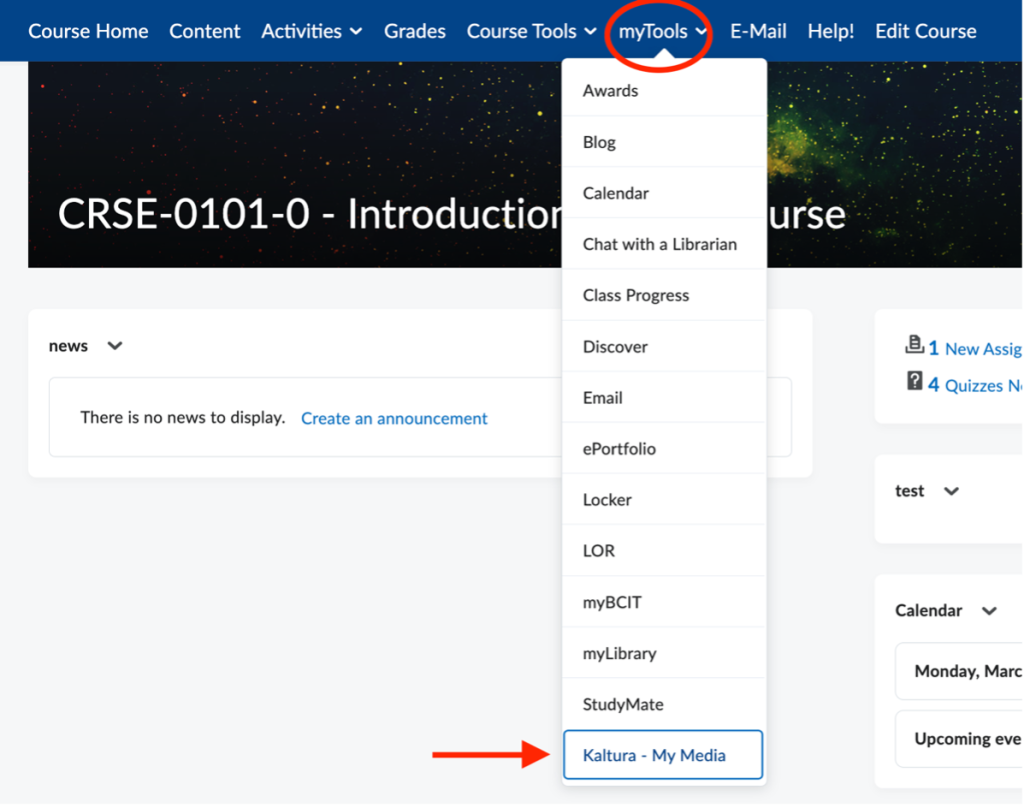
The Kaltura suite includes the following tools that are available in every Learning Hub course: Kaltura My Media, Kaltura Media Gallery, and Kaltura BSE. To begin, start with Kaltura My Media, this tool serves as your personal media repository linked to your BCIT employee account. To access it, open any course in the Learning Hub, select My Tools, and choose Kaltura My Media.
Kaltura My Media
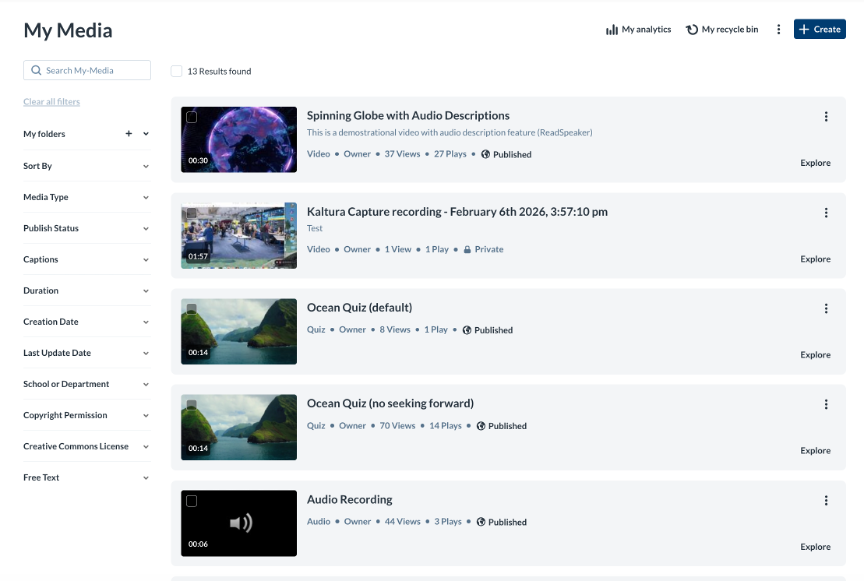
My Media is your personal Kaltura repository and is accessible from inside any Learning Hub course. It stores all the media you create or upload, and only you can view or manage its contents.
In My Media, you can:
- Upload or create new entries
- Search for entries using keywords and filters
- Use folders to organize your media
- Create, Edit, Delete, or Publish media
- View analytics for all entries or a specific entry
My Media is identical regardless of which course you open it from because it is tied to your BCIT employee account rather than to any specific course.
Creating Media
You can upload or create new media in My Media using the options under the + Create button.
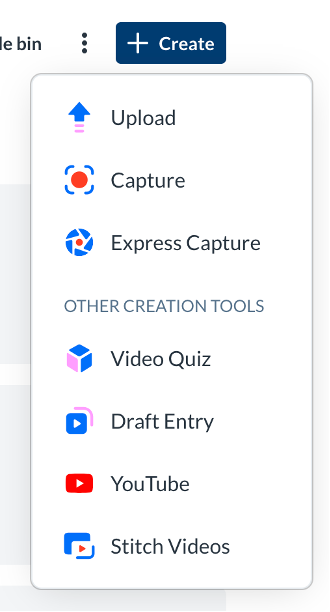
Upload
Upload video, audio or image files from your desktop (e.g., .mp4, .mov, .wav, .jpg, .png, etc…).
Capture
Download Kaltura Capture (for mac or windows only) to record long‑form content such as lectures. Recordings are saved to your device and can be uploaded to My Media at any time.
Express Capture
Use your webcam to quickly record short videos. Express Capture is ideal for introductions, quick updates, or brief demonstrations.
Video Quiz
Convert any Kaltura video into an interactive quiz with multiple‑choice, true/false, or short‑answer questions. Quiz entries can sync with the Learning Hub’s Grades tool. Please note quizzes can only be created using video entries.
Stitch Videos
Combine multiple Kaltura entries inside your My Media repository into a single video. Perfect for assembling clips or segment recordings.
YouTube
Import YouTube videos into My Media using their embed code. Note that editing options may be limited due to YouTube’s API restrictions.
Draft Entry
Create placeholder entries before uploading media files. This is helpful when planning content ahead of time.
Metadata
After creating a media entry, you must complete all required metadata fields before the entry can be published into any course. Missing metadata is the most common reason an entry cannot be published.
The required fields are:
- Name
- Creator Name
- Creator Email
- School or Department
- Copyright Permissions
- Creative Commons License
- Disclaimer (if applicable)
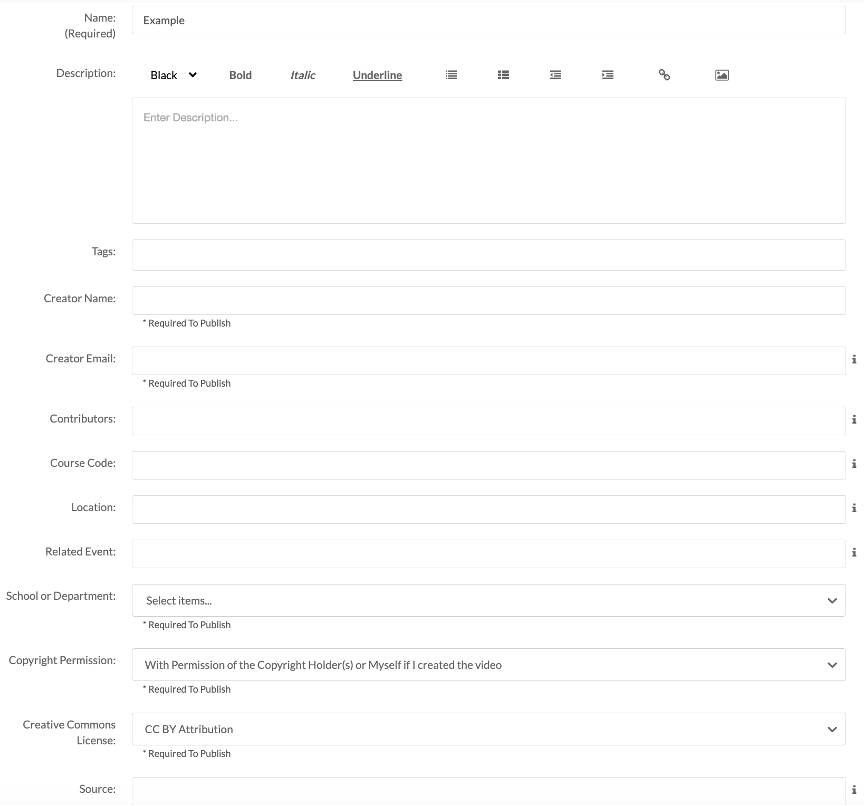
If you are unable to publish an entry in your course, it is likely missing one or more of these fields. To fix this, open My Media, locate the entry, select Edit, and complete the missing fields under the Details tab
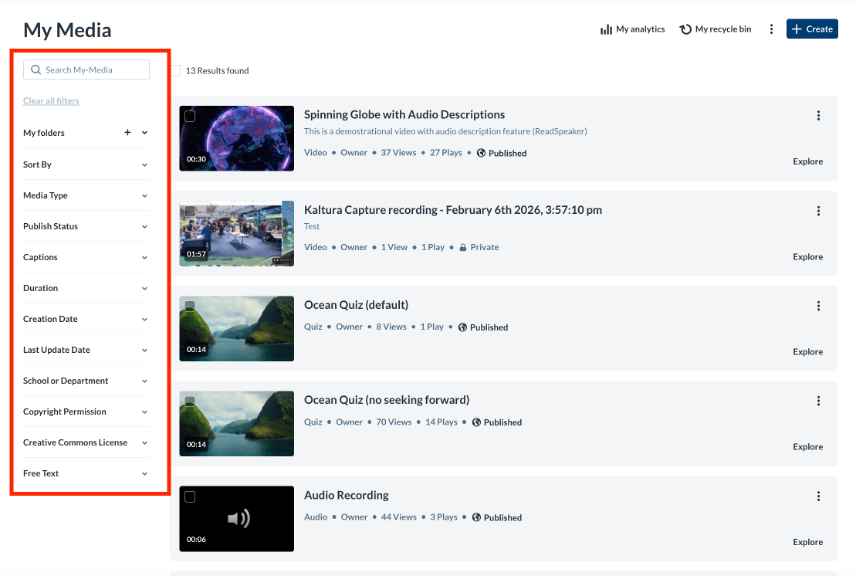
Searching Media
Use the search bar and available filters in the top-left corner of My Media to quickly locate specific entries. Search by keywords, media type, date, or other filters to narrow down your results and find the exact content you need.
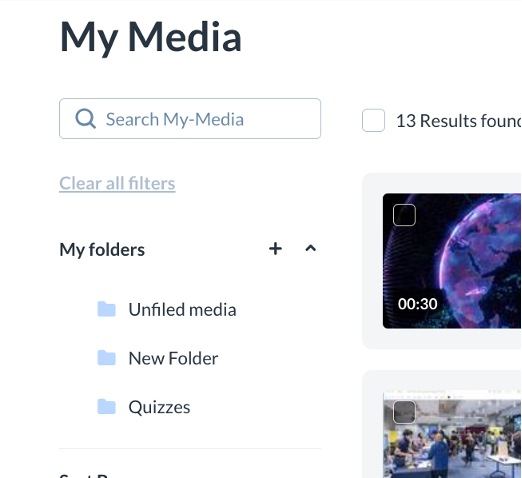
Organizing Media
Use My Folders to organize your Kaltura media. Select My Folders from the top-left corner of My Media, then click + to create and name a new folder. To move items into a folder, select the checkbox beside each media entry, choose More Actions, and select Add to Folders. Then choose the destination folder to complete the move.
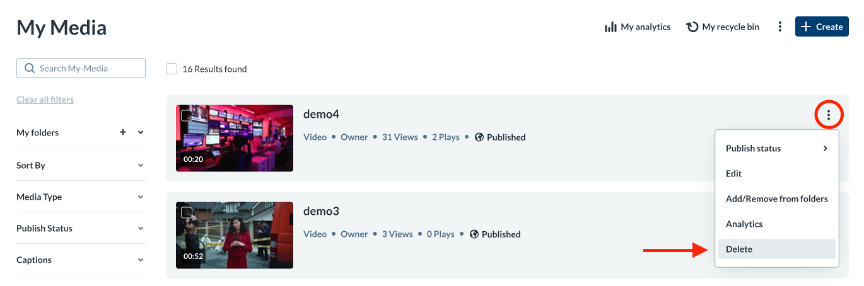
Deleting Media
Delete entries inside Kaltura My Media. Single entries can be deleted by clicking the ellipses dropdown menu on an entry and then selecting the delete option.
Multiple entries can be deleted by ticking the checkbox next to each entry and then selecting the delete option that appears at the top of My Media.
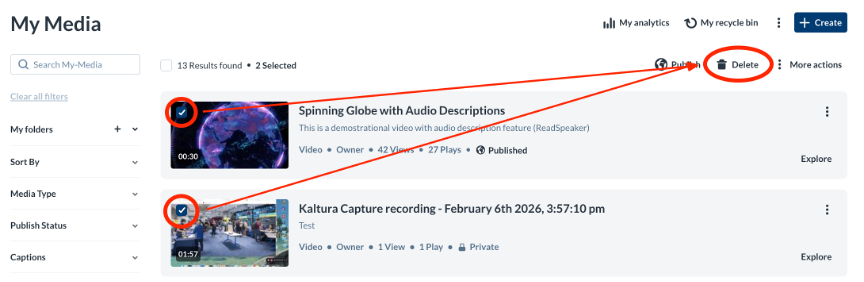
Deleted entries are sent to the Recycling Bin for 30 days before they are auto deleted permanently.
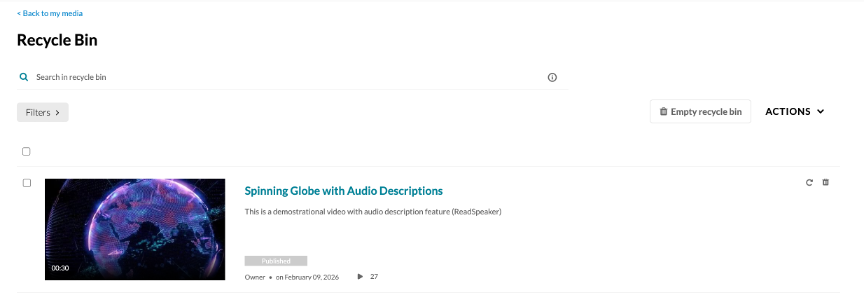
If an entry has been published, deleting from My Media will automatically remove it from all locations where it’s been shared. Restoring deleted entries from the Recycling Bin will also automatically reactivate the entry everywhere it has been published.
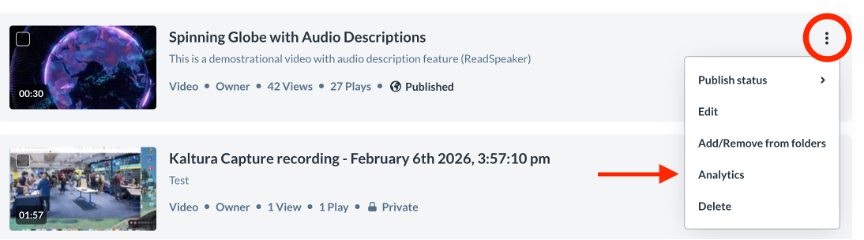
Analyzing Media
Access analytics for all your entries by selecting My Analytics at the top of My Media. To view analytics for a specific entry, click the ellipses beside the item and choose analytics from the dropdown menu. This provides insights into views, engagement, and other performance data.
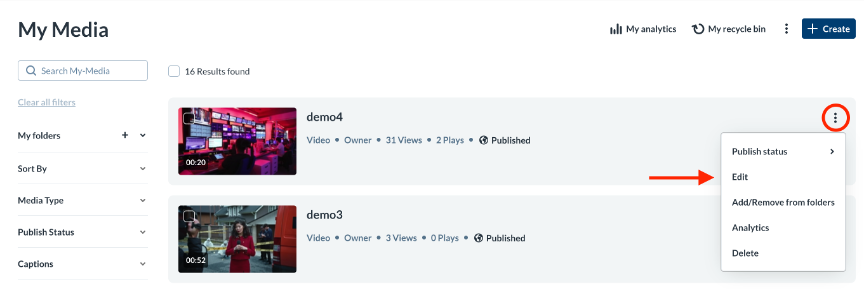
Editing Media
Edit a media entry by clicking the ellipses menu and selecting Edit.
From the Edit page, you can modify several aspects of your entry:
- Details – Update metadata (required for publishing)
- Publish – Publish the entry to selected courses
- Options – Allows viewers to create clips or copy an entry
- Thumbnails – Upload, capture, or auto‑generate a thumbnail
- Downloads – Enable or disable downloading
- Captions – View or edit captions
- Attachments – Upload supporting files (PDFs, Word docs, etc.)
- Timeline – Add chapters or slides
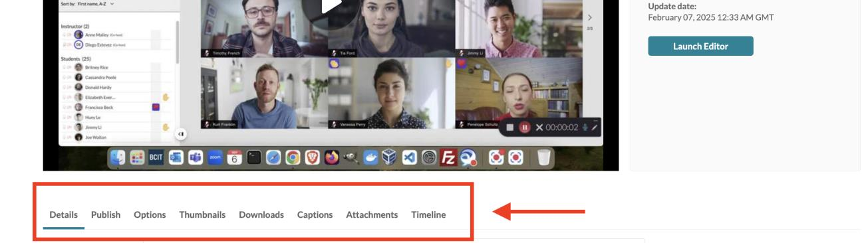
Note that some options may be restricted from view depending on the type of entry you are editing.
Kaltura Editor Tool
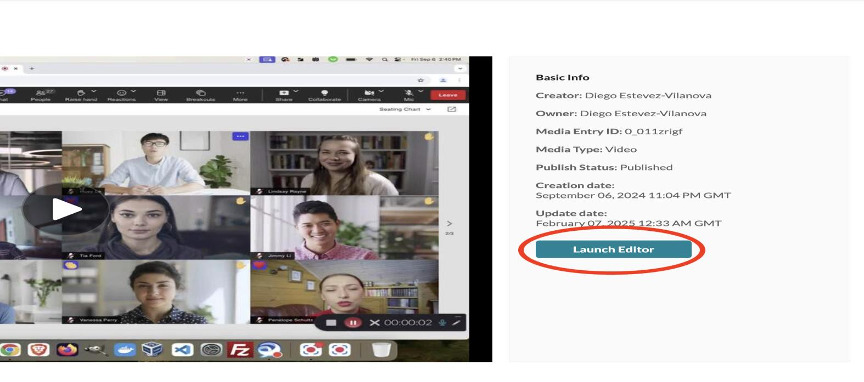
Use the Kaltura Editor to make significant changes to a media entry, create a copy, or convert it into a quiz. To open the editor, click the ellipses beside the entry, select Edit, and then choose Launch Editor.
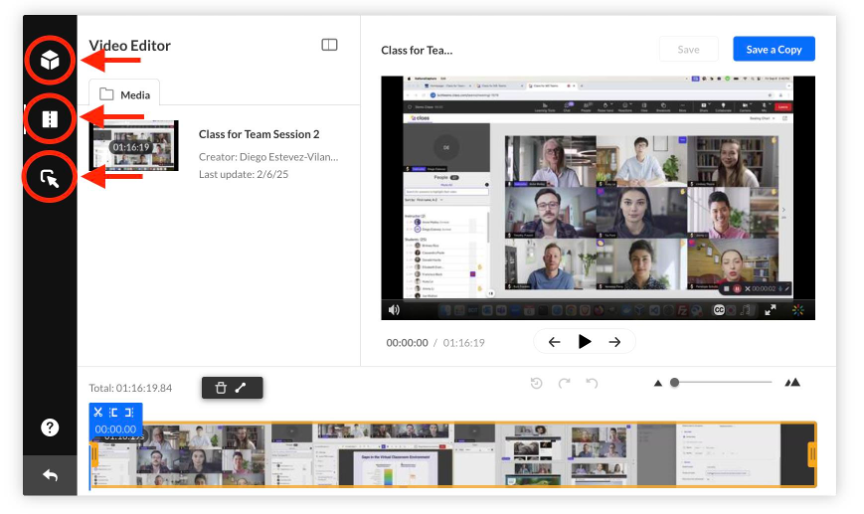
The Kaltura Editor includes three main tools, available from the left-side menu:
- Video Editor – Trim your entry, split segments, or add fade‑in and fade‑out transitions.
- Kaltura Quiz – Convert the entry into a Kaltura Quiz.
- Hotspots – Add interactive elements such as pop‑ups, informational callouts, or clickable links.
Publishing Media
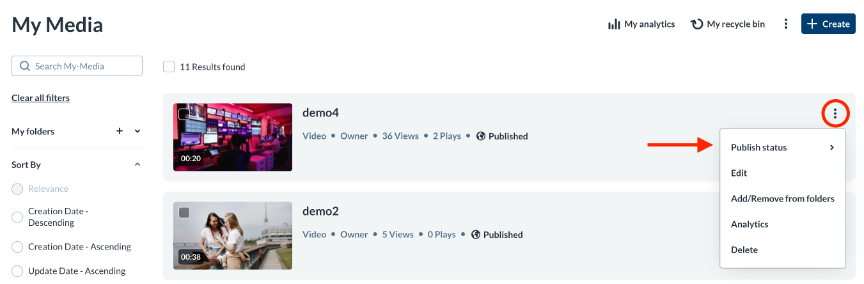
Publish Kaltura entries to a course’s Media Gallery directly from My Media. To publish a single entry, open the ellipses menu and select Publish status.
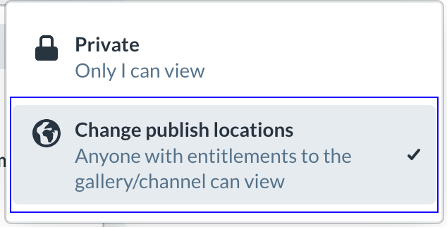
Next, choose Change publish locations to choose a Media gallery.
Then, select the course Media Gallery and click Save Changes.

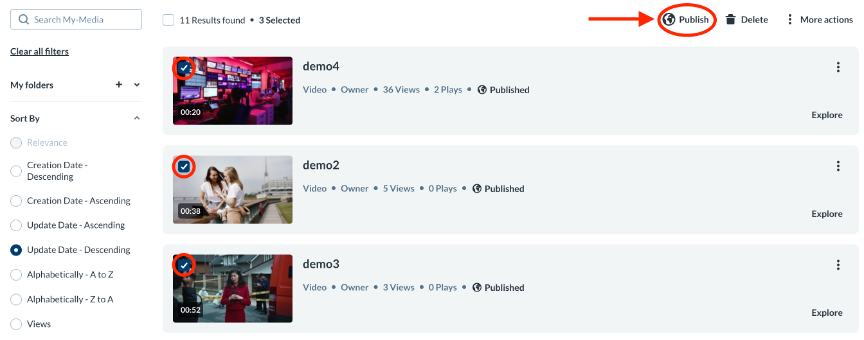
To publish multiple entries, select the checkboxes beside the entries you want to publish, then choose Publish from the top and follow the same steps shown above.
Missing Metadata
Entries missing required metadata cannot be published. Please check to make sure all required fields for an entry are filled in before publishing.
Kaltura Media Gallery
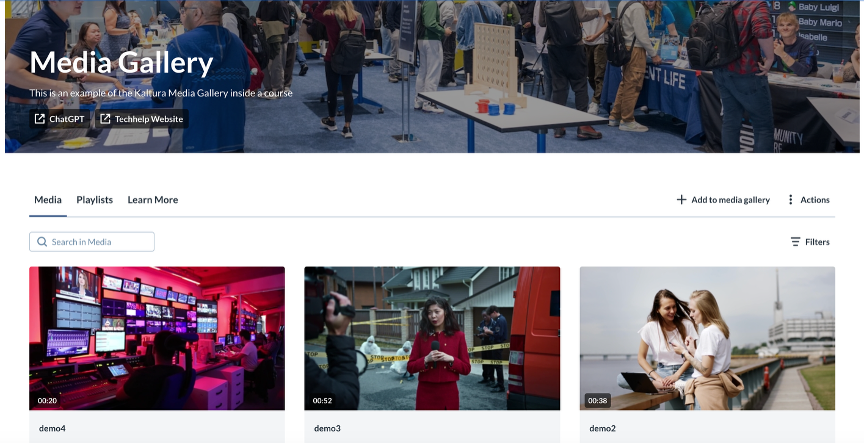
Media Gallery is a course‑specific repository where anyone enrolled in the course can view shared media or publish their own entries. Media Galleries enable you to:
- Publish entries for the entire class
- Allow students to publish their own media
- Moderate student submissions
- Create playlists
- View gallery‑level analytics
- Import entries from Media Galleries in other courses you teach
- Customize the gallery with a banner or external links
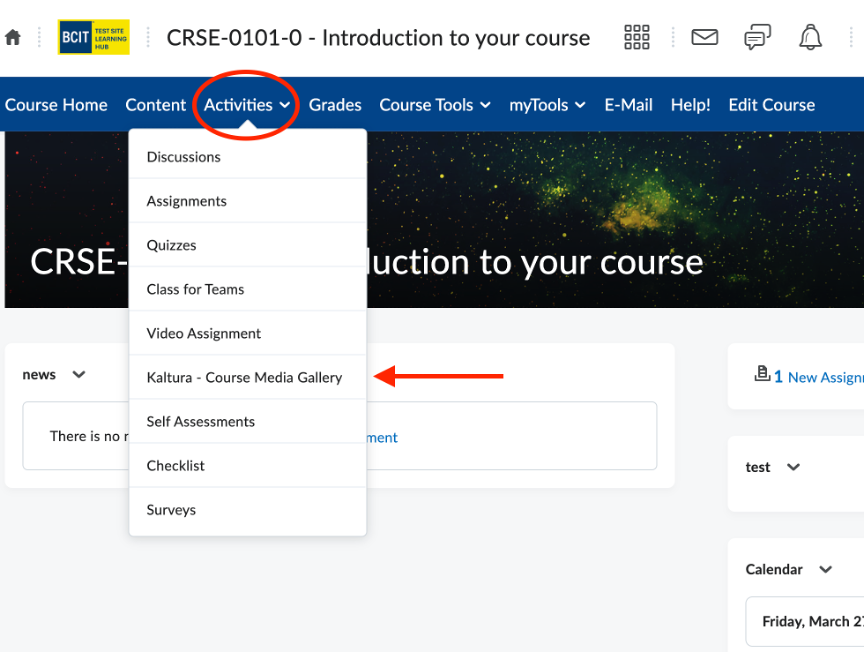
To access Kaltura Media Gallery, open a course in the Learning Hub, select the Activities menu, and choose Kaltura Media Gallery.
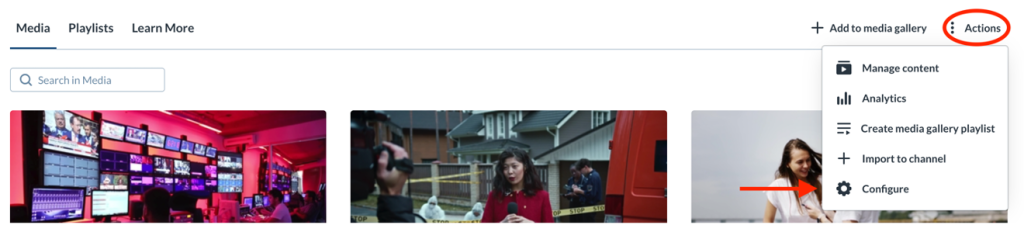
Media Gallery Actions
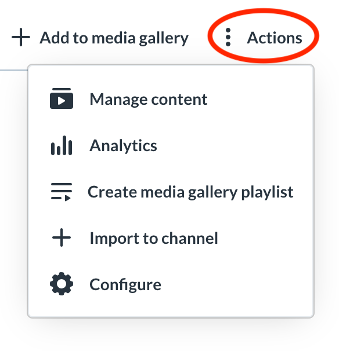
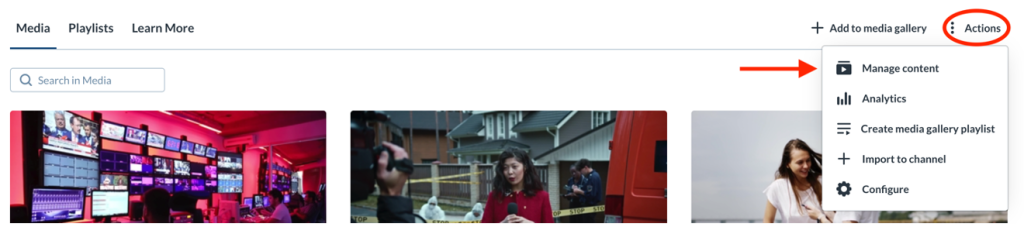
Use the Actions menu in Kaltura Media Gallery to manage and customize your course’s gallery. The Actions menu includes four options:
- Manage Content – Add, remove and organize how media appears in the gallery.
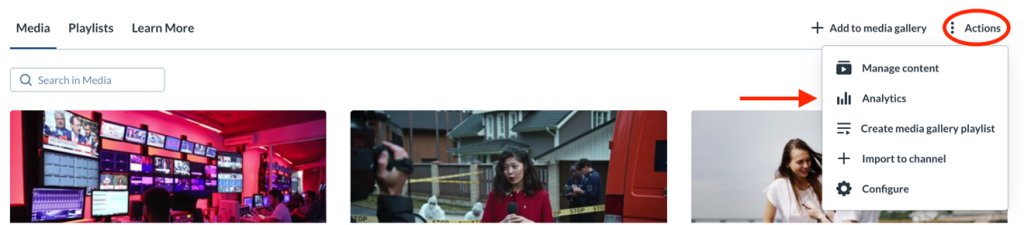
- Analytics – View engagement data and usage statistics.
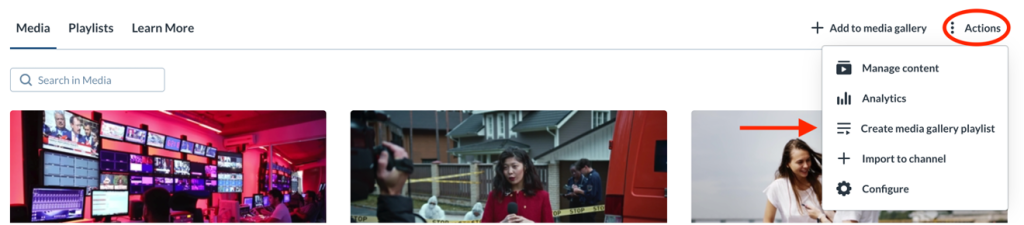
- Create a Media Gallery Playlist – Build playlists from entries published in the gallery.
- Import to Channel – Import all entries and playlists from another Media Gallery you own.
- Configure – Adjust the gallery’s settings, appearance, and behavior.
Managing Media Gallery
Control how media appears in your Media Gallery by clicking the Manage Content option.
In the manage area, you can:
- Add, remove and preview media
- Create, edit, preview and delete playlists
Analyzing Media Gallery
View engagement statistics for the course Media gallery by clicking the Analytics option.
Creating Playlists
Create playlists from entries published in the course Media Gallery by selecting the Create Media Gallery Playlist option.
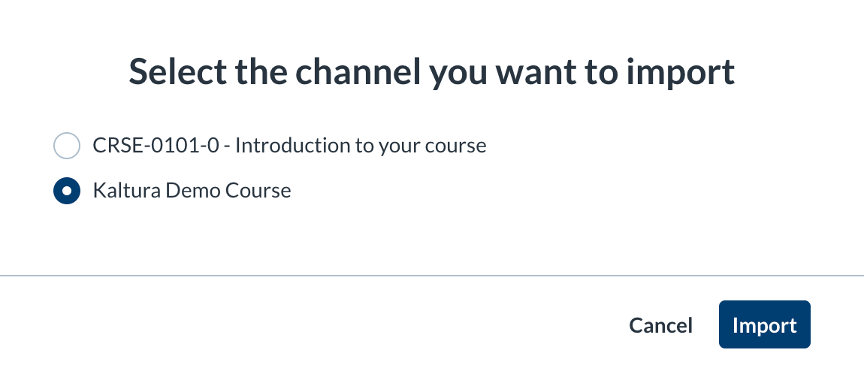
Importing into Media Gallery
Import entries from Media Galleries in other courses you teach by selecting Import to Channel.
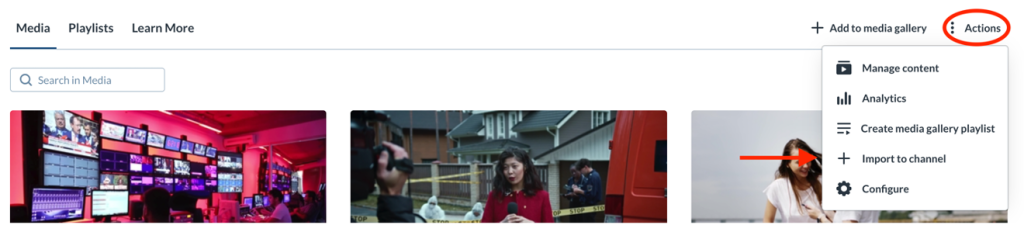
This action imports all entries and playlists from the selected gallery.
Selective Importing
The import tool copies over all entries from one Media Gallery into another, selective importing is not supported. If you need to import specific videos, please see the section below.
Configuring Media Gallery
Customize the behavior and the appearance of your Media Gallery by clicking on the Configure option.
In the configuration area, you can:
- Modify the gallery’s display title and description
- Enable or disable moderation for student‑submitted entries
- Enable or disable automatic publishing of entries added through Kaltura BSE (see Kaltura Browse and Embed)
- Create, delete, or edit playlists
- Change the gallery’s appearance
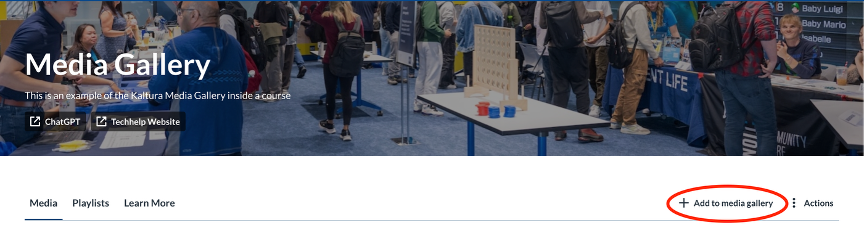
Publishing into Media Gallery
Publish your media to a course’s Media Gallery using + Add to media gallery from within My Media.
Tick the checkbox next to the entries you want to publish, then click Select to complete the action.
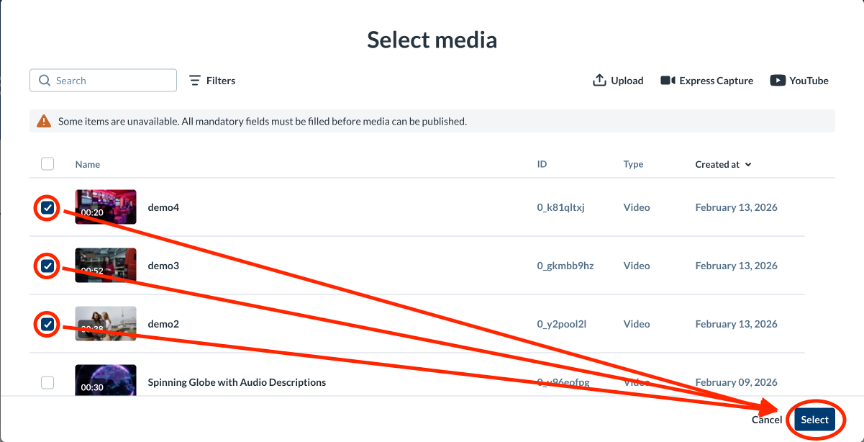 If any entries are missing required metadata, they cannot be selected. A warning message will appear at the top of the page indicating there are entries whose fields must be completed.

You can also publish entries to a Media Gallery directly from My Media.
Moderating Media Gallery
If moderation is enabled (from the Configure option under Actions), student‑submitted media must be approved before it appears in the course Media Gallery. When a submission is waiting, a notification bar appears at the top of the gallery
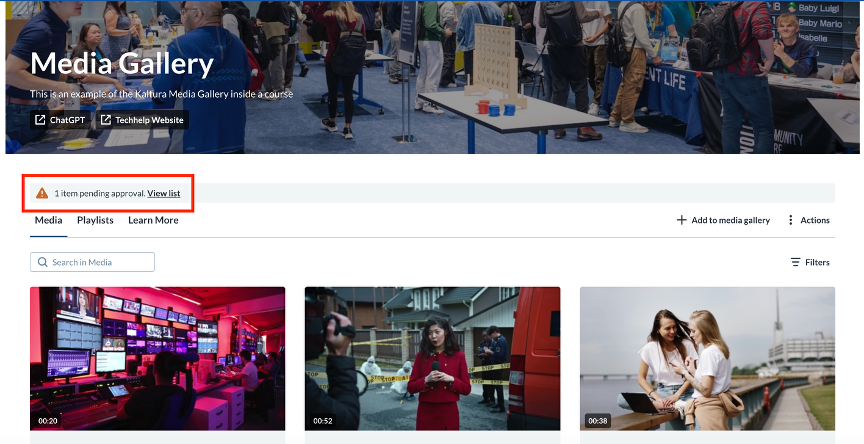
Select View list to open the moderation page. From there, review each item and choose:
- Approve — Publishes the entry to the gallery.
- Reject — Removes it from the queue.
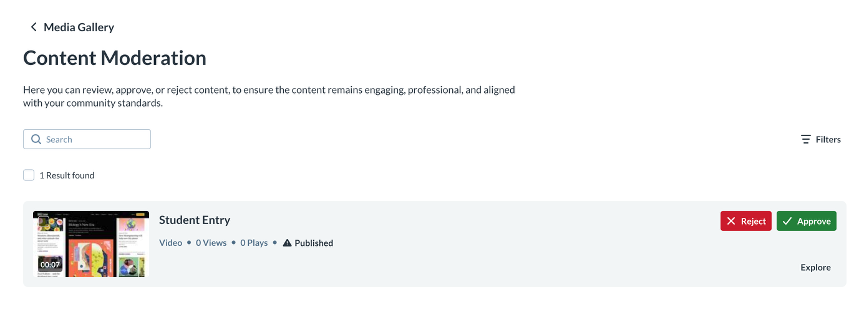
Only approved entries become will become visible to the class.
Kaltura Browse and Embed (BSE)
Kaltura Browse and Embed (BSE) lets you embed Kaltura media directly into your Learning Hub course content. Kaltura BSE includes two tools: Embed Kaltura Media and Insert Stuff. Using these tools you can embed Kaltura Media using custom players or embed Kaltura Quizzes.
Embed Kaltura Media
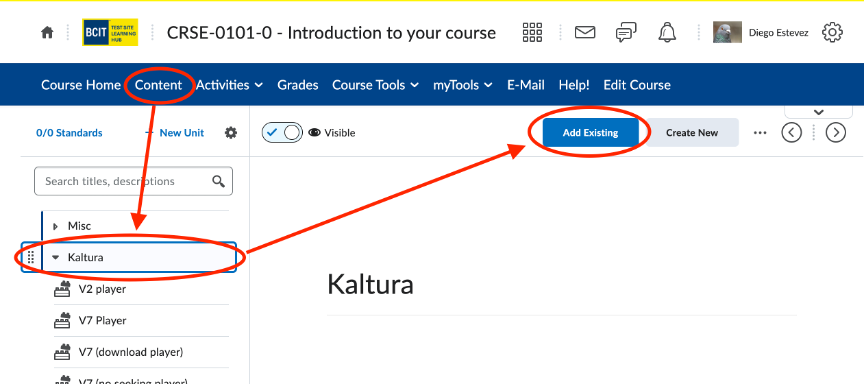
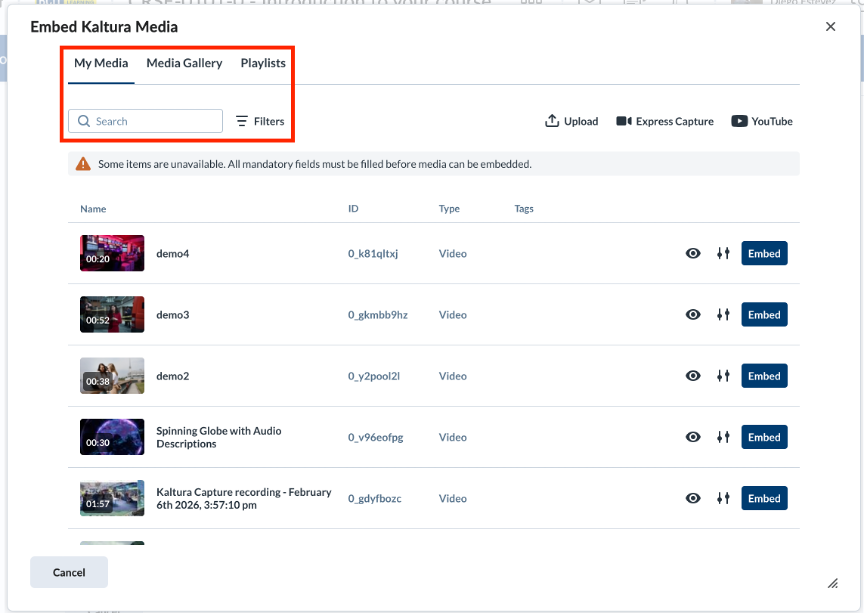
Use Embed Kaltura Media to add entries to the Content area of your course.
- Open your course content and locate or create a module. Then select Add Existing.
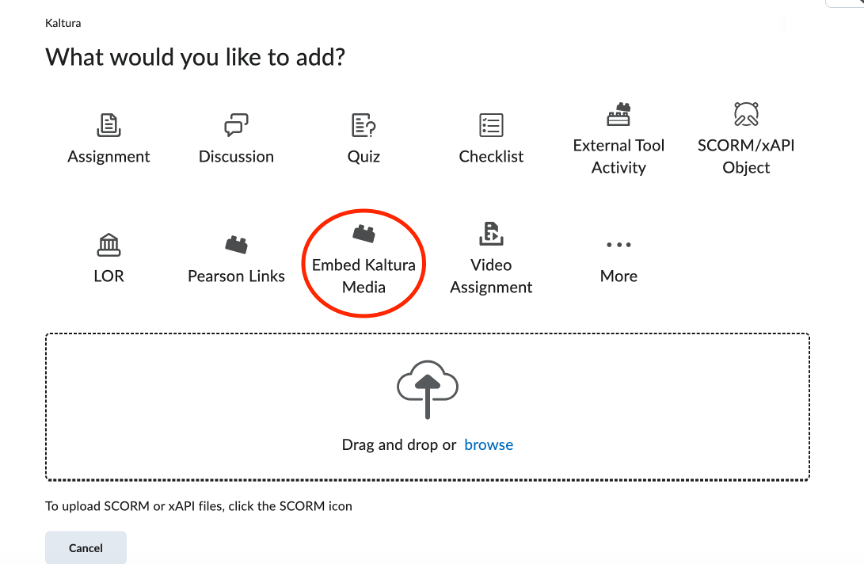
- Choose Embed Kaltura Media.

- In the modal window, find your entry using the My Media, Media Gallery, or Playlists tabs, or use the search bar.

- Click Embed to insert the entry with the default settings or select the settings icon
 to embed it using a custom player.
Insert Stuff
Use Insert Stuff to embed Kaltura entries into assignments, quizzes, discussions, announcements, and other tools that support rich text input.
- Look for the Insert Stuff icon
 in the text editor.
 - Select Embed Kaltura Media.
- In the modal window, find your entry using the My Media, Media Gallery, or Playlists tabs, or use the search bar.
- Click Embed to insert the entry with the default settings or select the settings icon to embed it using a custom player.
Custom Players
When embedding media through either of the BSE tools, you may choose to embed the entry using a custom player.
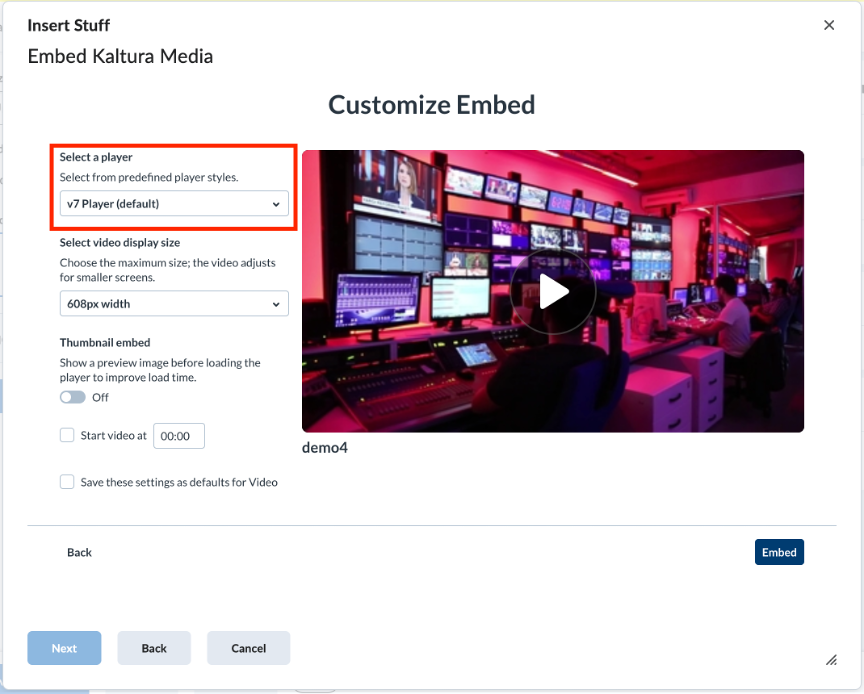
Different player will be available depending on the type of entry being embedded:
Video Entry
- V7 – Default Kaltura video player settings.
- V7 Download – Enables viewers to download the video file.
- V7 No Skip – Prevents viewers from fast forwarding the video.
Audio Entry
- Audio – Standard Kaltura audio player settings.
- Audio Download – Enables viewers to download the audio file.
Quiz Entry
- Quiz – Default Kaltura quiz player settings.
- Quiz No Skip – Prevents viewers from fast forwarding the quiz.
Playlist Entry
- Playlists – Default Kaltura playlist player settings
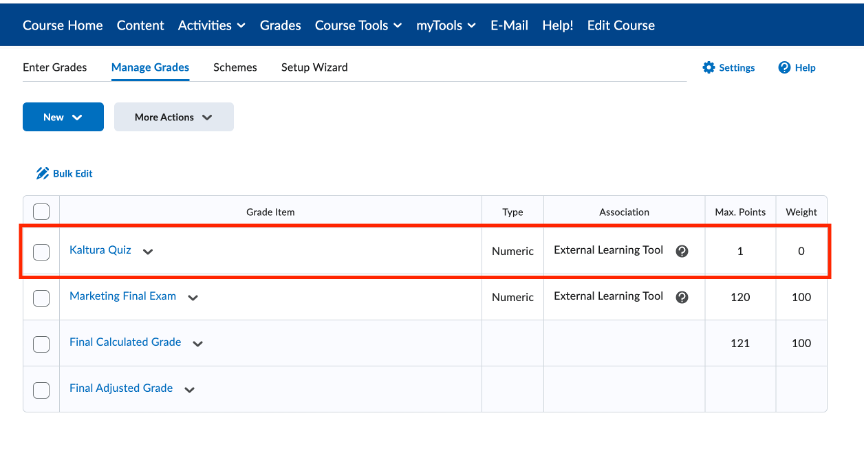
Kaltura Quizzes
Use the Embed Kaltura Media BSE tool to embed Kaltura Quiz entries into your course modules. When you embed a Kaltura Quiz, a corresponding grade item is automatically created in the Learning Hub’s Grades tool. By default, this grade item is worth 1 point and weighted at 0%, so you will need to update these settings based on your grading scheme.
Kaltura automatically grades multiple‑choice and true/false questions. Short‑answer questions must be graded manually.
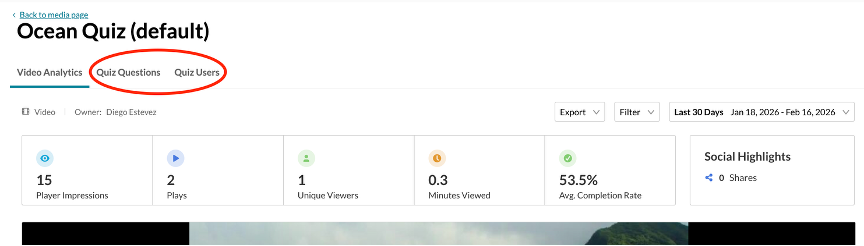
To view quiz data, open My Media, select the quiz entry, and choose Analytics from the ellipses menu.
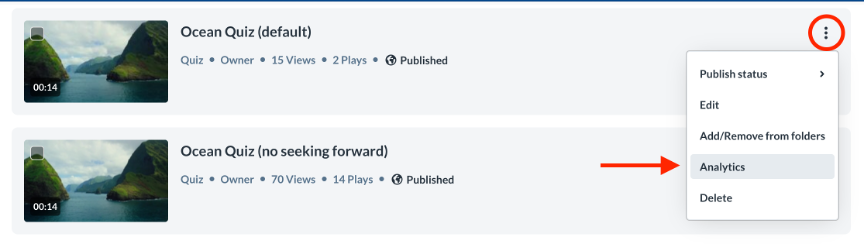
The Quiz Questions and Quiz Users tabs provide details such as student responses, scores, and submission times.
Missing Metadata
Please note that you will be unable to embed entries that are missing required metadata.
Rolling Over Kaltura Media
Kaltura is a third‑party tool that operates using the Learning Tools Interoperability (LTI) standard. As a result, Kaltura content may not roll over as seamlessly as built‑in Learning Hub tools such as quizzes or assignments.
When rolling over Kaltura content, keep the following in mind:
- A full course rollover will copy all Kaltura content into the new course except the Kaltura Media Gallery. To copy Media Gallery entries, you must either use the Import tool in the new course’s Media Gallery or re‑publish entries from your (or the original creator’s) My Media
- A partial course rollover requires you to manually include both the published Kaltura entries in Content and the specific External Learning Tool link for each item. As with a full rollover, Media Gallery entries will not copy over without using the Import tool or manually publishing them from My Media.
Need Help?
If you need assistance with anything related to Kaltura, the ETS Team is here to help. You can reach us by:
- Phone: 604‑412‑7444 (option 2)
- Email: techhelp@bcit.ca
If you prefer a self‑serve option, you can also browse our Kaltura job aids on the ETS Help website:
https://www.techhelpbcit.ca/category/kaltura/kaltura-learning-hub/
Related Posts
